Brunchographers

Lovingly documenting our favorite weekend ritual over coffee, cocktails, and compelling conversation.

Brunchographers: Lovingly documenting our favorite weekend ritual over coffee, cocktails, and compelling conversation.

  • L.A. Restaurants
    • Culver City
    • DTLA
    • East L.A.
    • Marina Del Rey
    • Santa Monica
    • Venice
    • West Hollywood
    • Westchester
    • All
  • L.A. Coffee Shops
    • Culver City
    • Hollywood
    • Mid-Wilshire
    • Santa Monica
    • South Bay
    • West Hollywood
    • All
  • Brunch At Home
    • Parties
    • In The Kitchen
    • All
  • Travel
    • Greece
    • United Kingdom
    • Orange County, CA
    • Portland, OR
    • All
  • Instagram
  • About
  • Contact
  • Work With Us
Maple Cranberry Harvest Granola, by Brunchographers

Maple Cranberry Harvest Granola, by Brunchographers

Maple Cranberry Autumn Harvest Granola

November 13, 2018 by Veronica Kablan in At Home

I LOVE GRANOLA. Truly, I can’t say this enough. I put it on everything, or just eat it on its own. My favorite recipes are liberal with the salt, creating that heavenly combination of sweet-meets-savory. A granola in my house will always have plenty of nuts, and will never have raisins. Never, never, never.

Maple Cranberry Harvest Granola, by Brunchographers

Maple Cranberry Harvest Granola, by Brunchographers

One thing I like to mix up in my granola is its texture. Sometimes I love a super-crisp, crunchy sort; one that needs a long bath in almond milk before you can sink your teeth into it. Other times, I’m into a softer granola with a higher moisture content, almost reminiscent of a museli, with a pleasant contrast between crisp, toasted nuts and a soft, sweet fruit (except raisins, never raisins). This recipe is the second kind.

Maple Cranberry Harvest Granola, by Brunchographers

Maple Cranberry Harvest Granola, by Brunchographers

If you have read many of our blog posts, you already know that we are pretty obsessed with two things: Fall harvest season and Milk & Eggs grocery delivery. This recipe is the perfect meeting of the two - we ordered up a bunch of our favorite fall treats, tossed them together with some spices and yummy grains, and baked ‘em low and slow until this yummy, festive granola was born.

There are some options here for modification, so feel free to play around. For one, if you don’t have fresh cranberries (or you don’t like their super-tart flavor as much as I do), you can swap out the fresh ones for 1 cup of dried cranberries. Or, if you’re one of those raisin people, you could swap out for those, too… just don’t tell me about it. Nuts and seeds are endlessly interchangeable, so are the fats (maybe try all olive oil or even coconut), so have fun with it! That’s what granola is all about.

Maple Cranberry Harvest Granola, by Brunchographers

Maple Cranberry Harvest Granola, by Brunchographers

Maple Cranberry Autumn Harvest Granola

Serves 7 - 10

Ingredients:
3 cups old fashioned rolled oats
2 cups cooked quinoa
1 cup raw pecans
1 cup raw pepitas (pumpkin seeds)
2 cups fresh cranberries (or 1 cup dried, if sweeter flavor is preferred)
3 small sweet apples (like Honeycrisp), chopped
1/4 cup butter or vegan butter
1/2 cup maple syrup
1/4 cup almond butter
1/4 cup apple butter
2 tsp vanilla extract
2 1/2 tsp pumpkin pie spice
1 tsp salt
2 tbsp honey

Method:

  1. Preheat oven to 325° F, and line two baking sheets with parchment paper.

  2. In a large bowl, combine the oats, cooked quinoa, pecans, pumpkin seeds, cranberries, and chopped apples.

  3. Place a small saucepan over medium-low heat, and warm the butter until melted and foamy. Remove from heat and stir in almond butter, apple butter, maple syrup, and vanilla extract. Add the pumpkin pie spice mix and salt, and stir until smooth and well incorporated.

  4. Pour the warm butter mixture over the dry oat mixture, and thoroughly stir to combine, ensuring that everything is well incorporated.

  5. Spread the granola evenly across the prepared baking sheets, and bake for 30 - 40 minutes, tossing the mixture and rotating the pans halfway through the baking process. Once the granola is crisp on the edges, and the fruit is fully cooked, remove from oven, and drizzle 2 tbsp honey over the hot granola. Allow granola to cool completely before serving or storing*.

*because this recipe contains fresh fruit, it’s best to eat it within a few days of baking. It can also be stored in the fridge to extend its life, if desired.

Recipe adapted from Half Baked Harvest

Maple Cranberry Harvest Granola, by Brunchographers

Maple Cranberry Harvest Granola, by Brunchographers

Groceries for this post were kindly provided by Milk & Eggs, our favorite grocery delivery service! All opinions are our own.  

November 13, 2018 /Veronica Kablan
Recipes, Autumn, Fall, Maple, Granola, Milk and Eggs, Harvest, Apples, Cranberries
At Home
Comment
Apple and Turkey Grilled Cheese with Caramelized Shallots, by Bruchographers

Apple and Turkey Grilled Cheese with Caramelized Shallots, by Bruchographers

Apple and Turkey Grilled Cheese with Caramelized Shallots

October 29, 2018 by Veronica Kablan in At Home

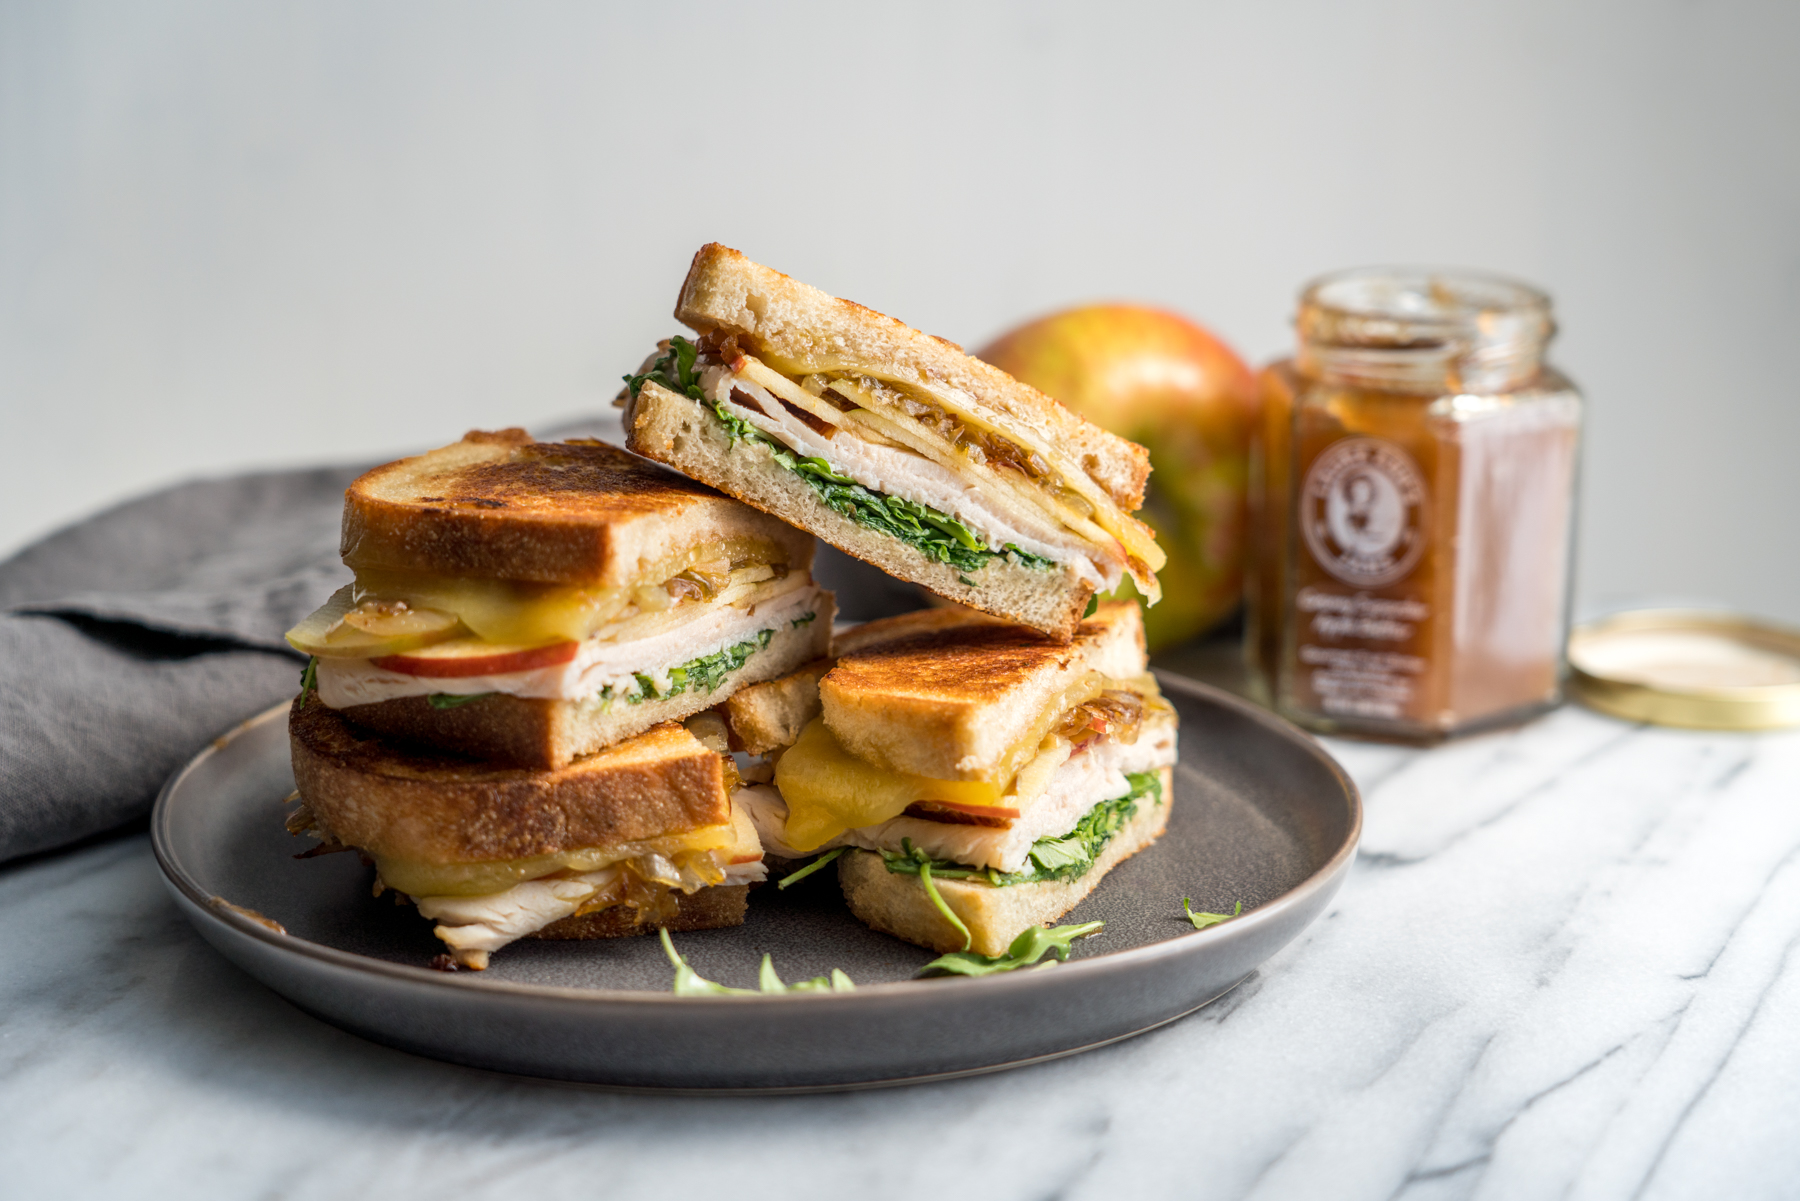
Friends, I have a very serious question for you: at what point is a cheese-filled grilled sandwich no longer a “grilled cheese”? How many non-cheese things can you really stuff into said sandwich, exactly, before you can no longer call it a “grilled cheese” with a straight face?

This grilled cheese sandwich will probably get some flack for having too many non-cheese ingredients. And that’s okay. Because no matter what you want to call it, this sandwich is really delicious.

Caramelized Shallots, by Brunchographers

Caramelized Shallots, by Brunchographers

With sliced apples and apple butter, and crispy, caramelized shallots, this little number is a perfect (and super quick) way to celebrate fall. What makes it really special, though, is how it marries sweet, salty, bitter, and tangy flavors together into one heavenly bite - it’s a pretty blissful experience, really.

Groceries from Milk and Eggs for Apple and Turkey Grilled Cheese with Caramelized Shallots, by Brunchographers

Groceries from Milk and Eggs for Apple and Turkey Grilled Cheese with Caramelized Shallots, by Brunchographers

Quality of ingredients is truly paramount here, as each element shines through so proudly, so be sure to select the freshest possible components. We ordered our groceries for this recipe from Milk and Eggs, where we could get good organic cheese, freshly baked local sourdough, and tart honeycrisp apples. Have fun with the ingredients and mix it up if you like; this would be delicious without the turkey if you’re vegetarian, or with pears if that’s what you have on hand, or with fig jam and provolone instead of cheddar and apple butter. It’s endlessly customizable, really. What’s most important is that you have fun, and never listen to what anybody tells you about there being rules for grilled cheese sandwiches. Because that’s just silly.

Apple and Turkey Grilled Cheese with Caramelized Shallots, by Brunchographers

Apple and Turkey Grilled Cheese with Caramelized Shallots, by Brunchographers

Apple and Turkey Grilled Cheese with Caramelized Shallots, by Brunchographers

Apple and Turkey Grilled Cheese with Caramelized Shallots, by Brunchographers

Apple and Turkey Grilled Cheese with Caramelized Shallots

Makes 2 Sandwiches

Ingredients:
1 tbsp olive oil
2 shallots, thinly sliced
4 slices sourdough bread
2 - 3 tbsp butter
2 tbsp dijon mustard
2 tbsp apple butter
2 slices sharp cheddar cheese
1/2 apple, sliced very thin
2 - 3 slices oven roasted deli turkey breast
1 cup arugula  
Sea salt

Method:

  1. Begin by caramelizing the shallots. In a medium skillet, heat the olive oil over medium-low heat. Add the shallots and stir to coat in the oil. Add a pinch of salt, and sauté until golden brown and crisp on the edges, about 15 minutes. Set aside.

  2. Preheat a clean skillet or griddle over medium-low heat.

  3. Spread two slices of bread with apple butter, and the other two slices with dijon mustard. Place a small, compressed handful of arugula on top of each of the dijon bread slices, followed by a slice of turkey. Layer 3 - 5 apple slices on top of the turkey, then about 2 tablespoons of the caramelized shallots, and then a slice of cheese. Place a slice of the bread with apple butter on top of each and press firmly. Spread the outside of each slice of bread with a bit of butter.

  4. Melt 1 tbsp of butter in the heated pan, and swirl around to coat the entire surface. Cook each sandwich for 2 - 4 minutes on each side, or until the cheese has melted and the outside is golden brown. Slice in half and enjoy warm.

Recipe inspired by Dolly and Oatmeal

Apple and Turkey Grilled Cheese with Caramelized Shallots, by Brunchographers

Apple and Turkey Grilled Cheese with Caramelized Shallots, by Brunchographers

Groceries for this post were kindly provided by Milk & Eggs, our favorite grocery delivery service! All opinions are our own.  

October 29, 2018 /Veronica Kablan
grilled cheese, Sandwich, Fall, Autumn, Recipes, Apples, Milk and Eggs
At Home
Comment
Simple Butternut Squash Fritters, by Brunchographers

Simple Butternut Squash Fritters, by Brunchographers

Simple Butternut Squash Fritters

September 30, 2018 by Veronica Kablan in At Home

Each year in Los Angeles, we struggle with the coming of fall: as the markets and coffee shops tell us we should be donning boots and scarves, the weather continues to call for tank tops and flip flops. To cope, we love to welcome the flavors of fall into our kitchens (with the help of our favorite grocery delivery service, Milk & Eggs), in the form of warm spices, crisp apples, and of course, squash.

Butternut squash is a tried-and-true favorite - perfect when roasted or steamed, in a salad or in a soup. But what is one to do when the squash that’s been purchased is much too large for the recipe that’s been chosen? As we learned recently, the answer is simple - get out your box grater and make some fritters.

Simple Butternut Squash Fritters, by Brunchographers

Simple Butternut Squash Fritters, by Brunchographers

Shredding squash does take a bit of muscle, but it’s simple and quick enough, especially when preparing the small amount that this recipe calls for. That said, you can easily double this recipe if you’re cooking for a crowd. It’s a forgiving formula - feel free to swap in another herb, another flour, or even another type of squash. It’d be lovely with sweet potato, as well, I’d wager.

These fritters are delicious on their own, but adding some tangy yogurt or cream cheese will take them to the next level - we love using the almond varieties available from Kite Hill, or for something a little different, Brother’s Labneh (both available from our favorite grocery delivery service, Milk & Eggs). For a bit of extra protein, you could top them with a soft boiled egg - a little bit of runny yolk with these sweet-and-salty fritters would be absolute heaven.

Simple Butternut Squash Fritters, by Brunchographers

Simple Butternut Squash Fritters, by Brunchographers

Simple Butternut Squash Fritters

Serves 2 to 3

Ingredients:
2 cups peeled and shredded butternut squash
1/4 cup gluten-free all-purpose flour (I like Bob’s 1-to-1)
1 egg
1 tbsp fresh sage, finely chopped
1/4 tsp salt
Black pepper to taste
1-2 tbsp oil of choice, for frying  

To serve (optional):
1/2 cup yogurt, labneh, or cream cheese
Microgreens or chopped mixed herbs

Method:

  1. In a large bowl, toss the butternut squash, flour, sage, and salt until the squash is well coated. Beat the egg in a separate bowl, then add to squash mixture and stir until the mixture is moistened throughout.

  2. Line a plate with paper towels and set aside. Heat 1 tbsp oil in a skillet over medium heat until hot, and a small amount of mixture dropped into the oil sizzles.

  3. Using a 1/4 cup measure, scoop small mounds of the squash mixture into the skillet, using the back of the measuring cup to press the mounds into circle shapes and spacing them 1-2 inches apart. Cook the fritters for about 3 minutes on each side, or until golden brown and crispy on the edges. Transfer them to the paper-towel-lined plate, and repeat until all of the squash mixture has been cooked.

  4. Serve warm with a dollop of yogurt, labneh, or cream cheese, a sprinkling of microgreens or herbs, and salt and pepper to taste.

Recipe adapted from Just a Taste

Simple Butternut Squash Fritters, by Brunchographers

Simple Butternut Squash Fritters, by Brunchographers

Groceries for this post were kindly provided by Milk & Eggs, our favorite grocery delivery service! All opinions are our own.  

September 30, 2018 /Veronica Kablan
Milk and Eggs, Fritters, Fall, Autumn
At Home
Comment
French Toast with Balsamic Strawberry Sauce, Brunchographers

French Toast with Balsamic Strawberry Sauce, Brunchographers

French Toast with Balsamic Strawberry Sauce

August 14, 2018 by Veronica Kablan in At Home

I have this problem with buying too many strawberries. It happens every year when strawberry season hits - I see them lined up so beautifully at the market, perfectly plump and glistening, and I can't resist buying them by the crateful. Unfortunately, my eyes are usually bigger than my stomach, and before I know it, I've got a half-eaten box of strawberries that's about to go south. Is this just me?

French Toast with Balsamic Strawberry Sauce, Brunchographers

French Toast with Balsamic Strawberry Sauce, Brunchographers

To assuage my berry-related guilt, I've been experimenting with the best ways to use them before they go bad - I found that freezing them for later use in smoothies is an uncomplicated solution, roasting them can make for an unexpected dessert when paired with vanilla ice cream, or making a simple jam with them can make you feel like the accomplished farm wife you've always dreamt of being (again, just me?). Or, if a dressed-up, sexy brunch dish is what you're after (and lets be real, that's what we're all after), you can simmer them slowly with butter, maple syrup, and a touch of balsamic vinegar, and pour them over some custardy French toast. It's basically like going to strawberry heaven. 

French Toast with Balsamic Strawberry Sauce, Brunchographers

French Toast with Balsamic Strawberry Sauce, Brunchographers

For this recipe, I called upon the grocery-delivery angels at Milk & Eggs to bring the ingredients right to my door - including Bread Lounge's Walnut Loaf, a perfect petite rustic loaf that's chock full of walnuts and has a firm, chewy texture. If you use a dense loaf like this, be sure to give the slices ample time to soak up the egg mixture - you want to make sure the centers are nice and custardy! 

French Toast with Balsamic Strawberry Sauce, Brunchographers

French Toast with Balsamic Strawberry Sauce, Brunchographers

French Toast with Balsamic Strawberry Sauce 

For the French Toast:
1 loaf Bread Lounge Walnut Loaf (or similar small loaf of bread)
2 eggs
½ cup almond milk
¼ tsp vanilla bean paste (or vanilla extract)
1 tbsp butter or neutral oil 

For the Balsamic Strawberry Sauce:
2 cups strawberries, sliced
¼ cup maple syrup
2 tbsp butter (or margarine if dairy-free) 
1 tbsp balsamic vinegar 

To serve:
Whipped cream
Additional sliced strawberries
Powdered sugar

Method:

  1. Begin by preparing the strawberry sauce. In a medium skillet or saucepan, heat butter over medium-low heat until melted and bubbling. Add the 2 cups of sliced strawberries, and saute until softened, about two minutes. Add maple syrup, balsamic vinegar, and salt, and stir to combine. Reduce heat to low and simmer until strawberries have partially broken down and sauce has thickened. Remove from heat. 
  2. Next, prepare the French toast. In a medium bowl, whisk together eggs, almond milk, and vanilla bean paste. Set aside. 
  3. Slice the walnut loaf into one-inch-thick pieces. Slowly dip each slice of bread into the egg mixture, allowing some time for the mixture to soak into each slice (tip: I like to let each slice rest in the mixture for a minute or two, to ensure it soaks all the way into the bread). 
  4. Heat the 1 tbsp butter or oil in a large nonstick skillet or griddle over medium heat. Fry bread slices for 2-3 minutes per side, until golden brown and crisp on the edges. 
  5. To serve, reheat the strawberry sauce if it has cooled. Top the French Toast with additional fresh sliced strawberries, a generous pour of the strawberry sauce, a sprinkle of powdered sugar, and a dollop of whipped cream. Enjoy! 
     
French Toast with Balsamic Strawberry Sauce, Brunchographers

French Toast with Balsamic Strawberry Sauce, Brunchographers

Groceries for this post were kindly provided by Milk & Eggs, our favorite grocery delivery service! All opinions are our own.  

August 14, 2018 /Veronica Kablan
In The Kitchen, French Toast, Recipes, Strawberries, Summer, Milk and Eggs
At Home
3 Comments
Easy Peasy Breakfast Tacos, recipe by Brunchographers

Easy Peasy Breakfast Tacos, recipe by Brunchographers

Easy Peasy Breakfast Tacos

April 21, 2018 by Brunchographers in At Home

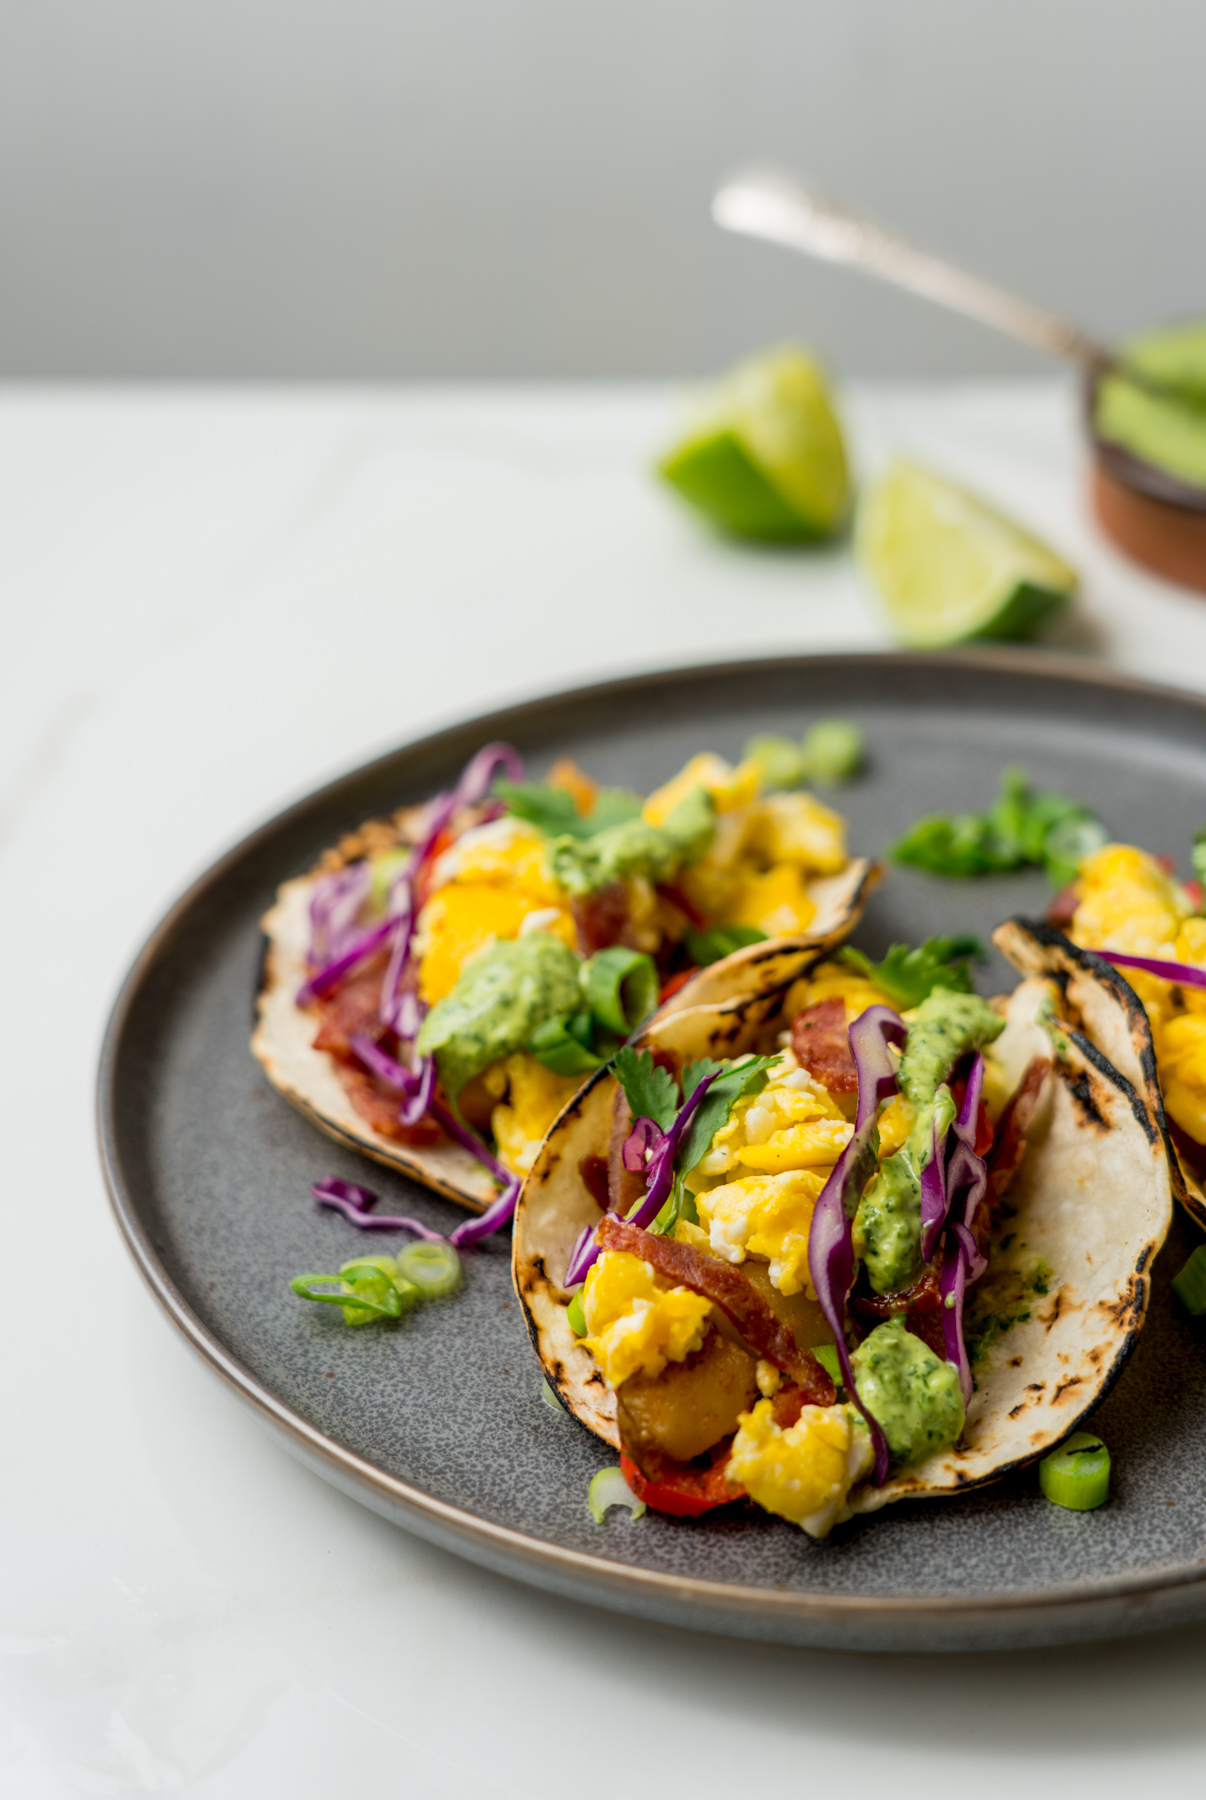
I don't need to wax philosophical for you about the magnificence of breakfast tacos. I know it, you know it, we all know it - eggs taste awesome tucked inside a warm tortilla. Add some flavorful accompaniments like savory chopped bacon, smoky potatoes and bell peppers, crunchy cabbage, and a zippy cilantro crema, and you're on the fast track to breakfast heaven. 

Easy Peasy Breakfast Tacos, recipe by Brunchographers

Easy Peasy Breakfast Tacos, recipe by Brunchographers

In my opinion, whether you opt for corn, flour, or otherwise, the fastest way to taco nirvana is to thoroughly char your tortilla. This simple step brings a toasty earthiness and an oh-so-satisfying crunch that you didn't know you were missing. I char mine directly on a gas burner for a few seconds on each side (no frying pan required), but you could also pop them under the broiler for a few minutes to achieve a similar effect. 

Easy Peasy Breakfast Tacos, recipe by Brunchographers

Easy Peasy Breakfast Tacos, recipe by Brunchographers

These tacos are a great way to sneak some extra pep (and veggies) into your breakfast routine, and if you make the veggies and the sauce ahead of time, they will come together quickly enough for a weekday breakfast. We love using tiny street-taco sized tortillas from Milk & Eggs, but you could easily use larger ones and stick with 1-2 tortillas per serving. 

Groceries for Easy Peasy Breakfast Tacos, recipe by Brunchographers

Groceries for Easy Peasy Breakfast Tacos, recipe by Brunchographers

A quick note - this recipe is entirely low-FODMAP, meaning it's low in certain carbohydrates that can be irritating to people with digestive disorders. I'm currently following a low-FODMAP diet for the short term (as prescribed by my doctor to help alleviate some tummy issues), and have enjoyed experimenting with my favorite recipes to fit my current diet! If you and your belly are in a good place, and you want to kick things up a notch and add in some super-tasty FODMAP foods (hello, garlic and onion!), feel free to toss in a diced onion with the potato mixture, or top your tacos with your favorite salsa. Go crazy! 

Easy Peasy Breakfast Tacos, recipe by Brunchographers

Easy Peasy Breakfast Tacos, recipe by Brunchographers

Easy Peasy Breakfast Tacos

Ingredients

For the Tacos
4 slices bacon or turkey bacon
8 eggs
1 russet potato, peeled and cubed
1/2 red bell pepper, sliced thin
1/2 teaspoon salt (plus more to taste)
1/2 teaspoon ground cumin
1/4 teaspoon paprika
1/4 teaspoon chili powder
1 tablespoon olive oil or butter
pepper

For the Cilantro "Crema"
1/2 cup mayo of choice (my favs are soy-free Vegenaise or Primal Kitchen)
1/2 bunch fresh cilantro
juice of 2 small limes (about 3 tablespoons)
salt + pepper to taste

To Serve
12 street-style corn tortillas, or 8 regular (6-inch) tortillas, charred* 
1/4 purple cabbage, shredded thinly
1/4 cup green onions, chopped (green part only if low-FODMAP)
extra cilantro
lime wedges

First, make the cilantro "crema" by combining the mayo, cilantro, and lime juice in a small food processor or blender. Process or pulse the mixture until it's well combined, and it's taken on a bright green color. Season to taste with salt and pepper. Transfer to a jar and refrigerate until ready to use (note: you'll have leftovers, so try it on burgers or as a dip with veggies!).

To make the vegetable filling, begin by placing cubed potatoes in a medium pot and covering with cold water. Bring to a boil, then simmer about four minutes, or until potatoes are tender. Drain thoroughly and set aside. 

While the potatoes boil, cook the bacon to desired crispiness in a large skillet, following package instructions. Once cooked, the bacon to a paper-towel-lined plate to drain excess oil and allow it to cool. Once it's cool enough to handle, give it a coarse chop, or crumble it with your fingers. 

Using the same skillet as used for the bacon, toss the potatoes, bell pepper, and spices in the bacon drippings (note: if using turkey bacon, you'll want to add some extra oil to keep the veggies from sticking to the skillet). Cook over medium heat until the peppers are soft and the potatoes have browned slightly. Set aside. 

In a separate, nonstick skillet, warm the olive oil or butter over medium-low heat. Add in the eggs and whisk them in the pan using a rubber spatula (this is similar to the Gordon Ramsay style, but we find that doing it over low heat allows you to keep the pan on the burner the whole time. That back and forth bit he does is exhausting). Continue to gently push and fold the eggs together until they begin to set. Remove them from the heat and set aside just before they look fully cooked, to avoid drying them out. Season with salt and pepper to taste. 

Now it's time to assemble your tacos. Fill each tortilla with a heaping spoonful of the potato mixture, followed by the eggs, and a bit of crumbled bacon. Drizzle on some cilantro "crema" and sprinkle on shredded cabbage, green onions, and cilantro as desired. Serve with a slice of lime. 

*To char your tortillas, place them directly on a lit gas burner for 5 - 10 seconds on each side, using tongs to flip halfway through. Be sure to keep a very close eye on them if you use this method; they can go up in smoke quickly if left unattended! If you don't have a gas burner, you could also pop them under a hot broiler for a few minutes to achieve a similar effect. 

Note: potato + bell pepper mixture portion of this recipe has been adapted from The Kitchn. 

Easy Peasy Breakfast Tacos, recipe by Brunchographers

Easy Peasy Breakfast Tacos, recipe by Brunchographers

Groceries for this post were kindly provided by Milk & Eggs, our favorite grocery delivery service! All opinions are our own.  

April 21, 2018 /Brunchographers
Tacos, At Home, Cooking, Breakfast, Milk and Eggs
At Home
10 Comments
  • Newer
  • Older