Brunchographers

Lovingly documenting our favorite weekend ritual over coffee, cocktails, and compelling conversation.

Brunchographers: Lovingly documenting our favorite weekend ritual over coffee, cocktails, and compelling conversation.

  • L.A. Restaurants
    • Culver City
    • DTLA
    • East L.A.
    • Marina Del Rey
    • Santa Monica
    • Venice
    • West Hollywood
    • Westchester
    • All
  • L.A. Coffee Shops
    • Culver City
    • Hollywood
    • Mid-Wilshire
    • Santa Monica
    • South Bay
    • West Hollywood
    • All
  • Brunch At Home
    • Parties
    • In The Kitchen
    • All
  • Travel
    • Greece
    • United Kingdom
    • Orange County, CA
    • Portland, OR
    • All
  • Instagram
  • About
  • Contact
  • Work With Us
Build-Your-Own-Mimosa Bar Party, featuring Mionetto Prosecco - Brunchographers

Build-Your-Own-Mimosa Bar Party, featuring Mionetto Prosecco - Brunchographers

A Build-Your-Own-Mimosa Bar Party

July 03, 2019 by Brunchographers in At Home

Summer is finally here, and let me tell you, we are ready. We've been packing our calendars full with plans for outdoor movies and concerts, lazy days at the beach, and lots of dining al fresco. If you ask us, fresh-air dining need not be limited to barbecue lunches and dinners, either - you may not be surprised to learn that we’re big proponents of taking brunch outside, too. In fact, it’s hard to imagine anything more lovely than spending a warm summer morning in the backyard, sipping mimosas with friends... except, perhaps, if there was an entire mimosa bar, full of bright, fresh juices, crisp Prosecco, and plenty of colorful, in-season fruit. I ask you (as rhetorically as Ina Garten might), is there anything more delightfully summery than that?

Build-Your-Own-Mimosa Bar Party, featuring Mionetto Prosecco - Brunchographers

Build-Your-Own-Mimosa Bar Party, featuring Mionetto Prosecco - Brunchographers

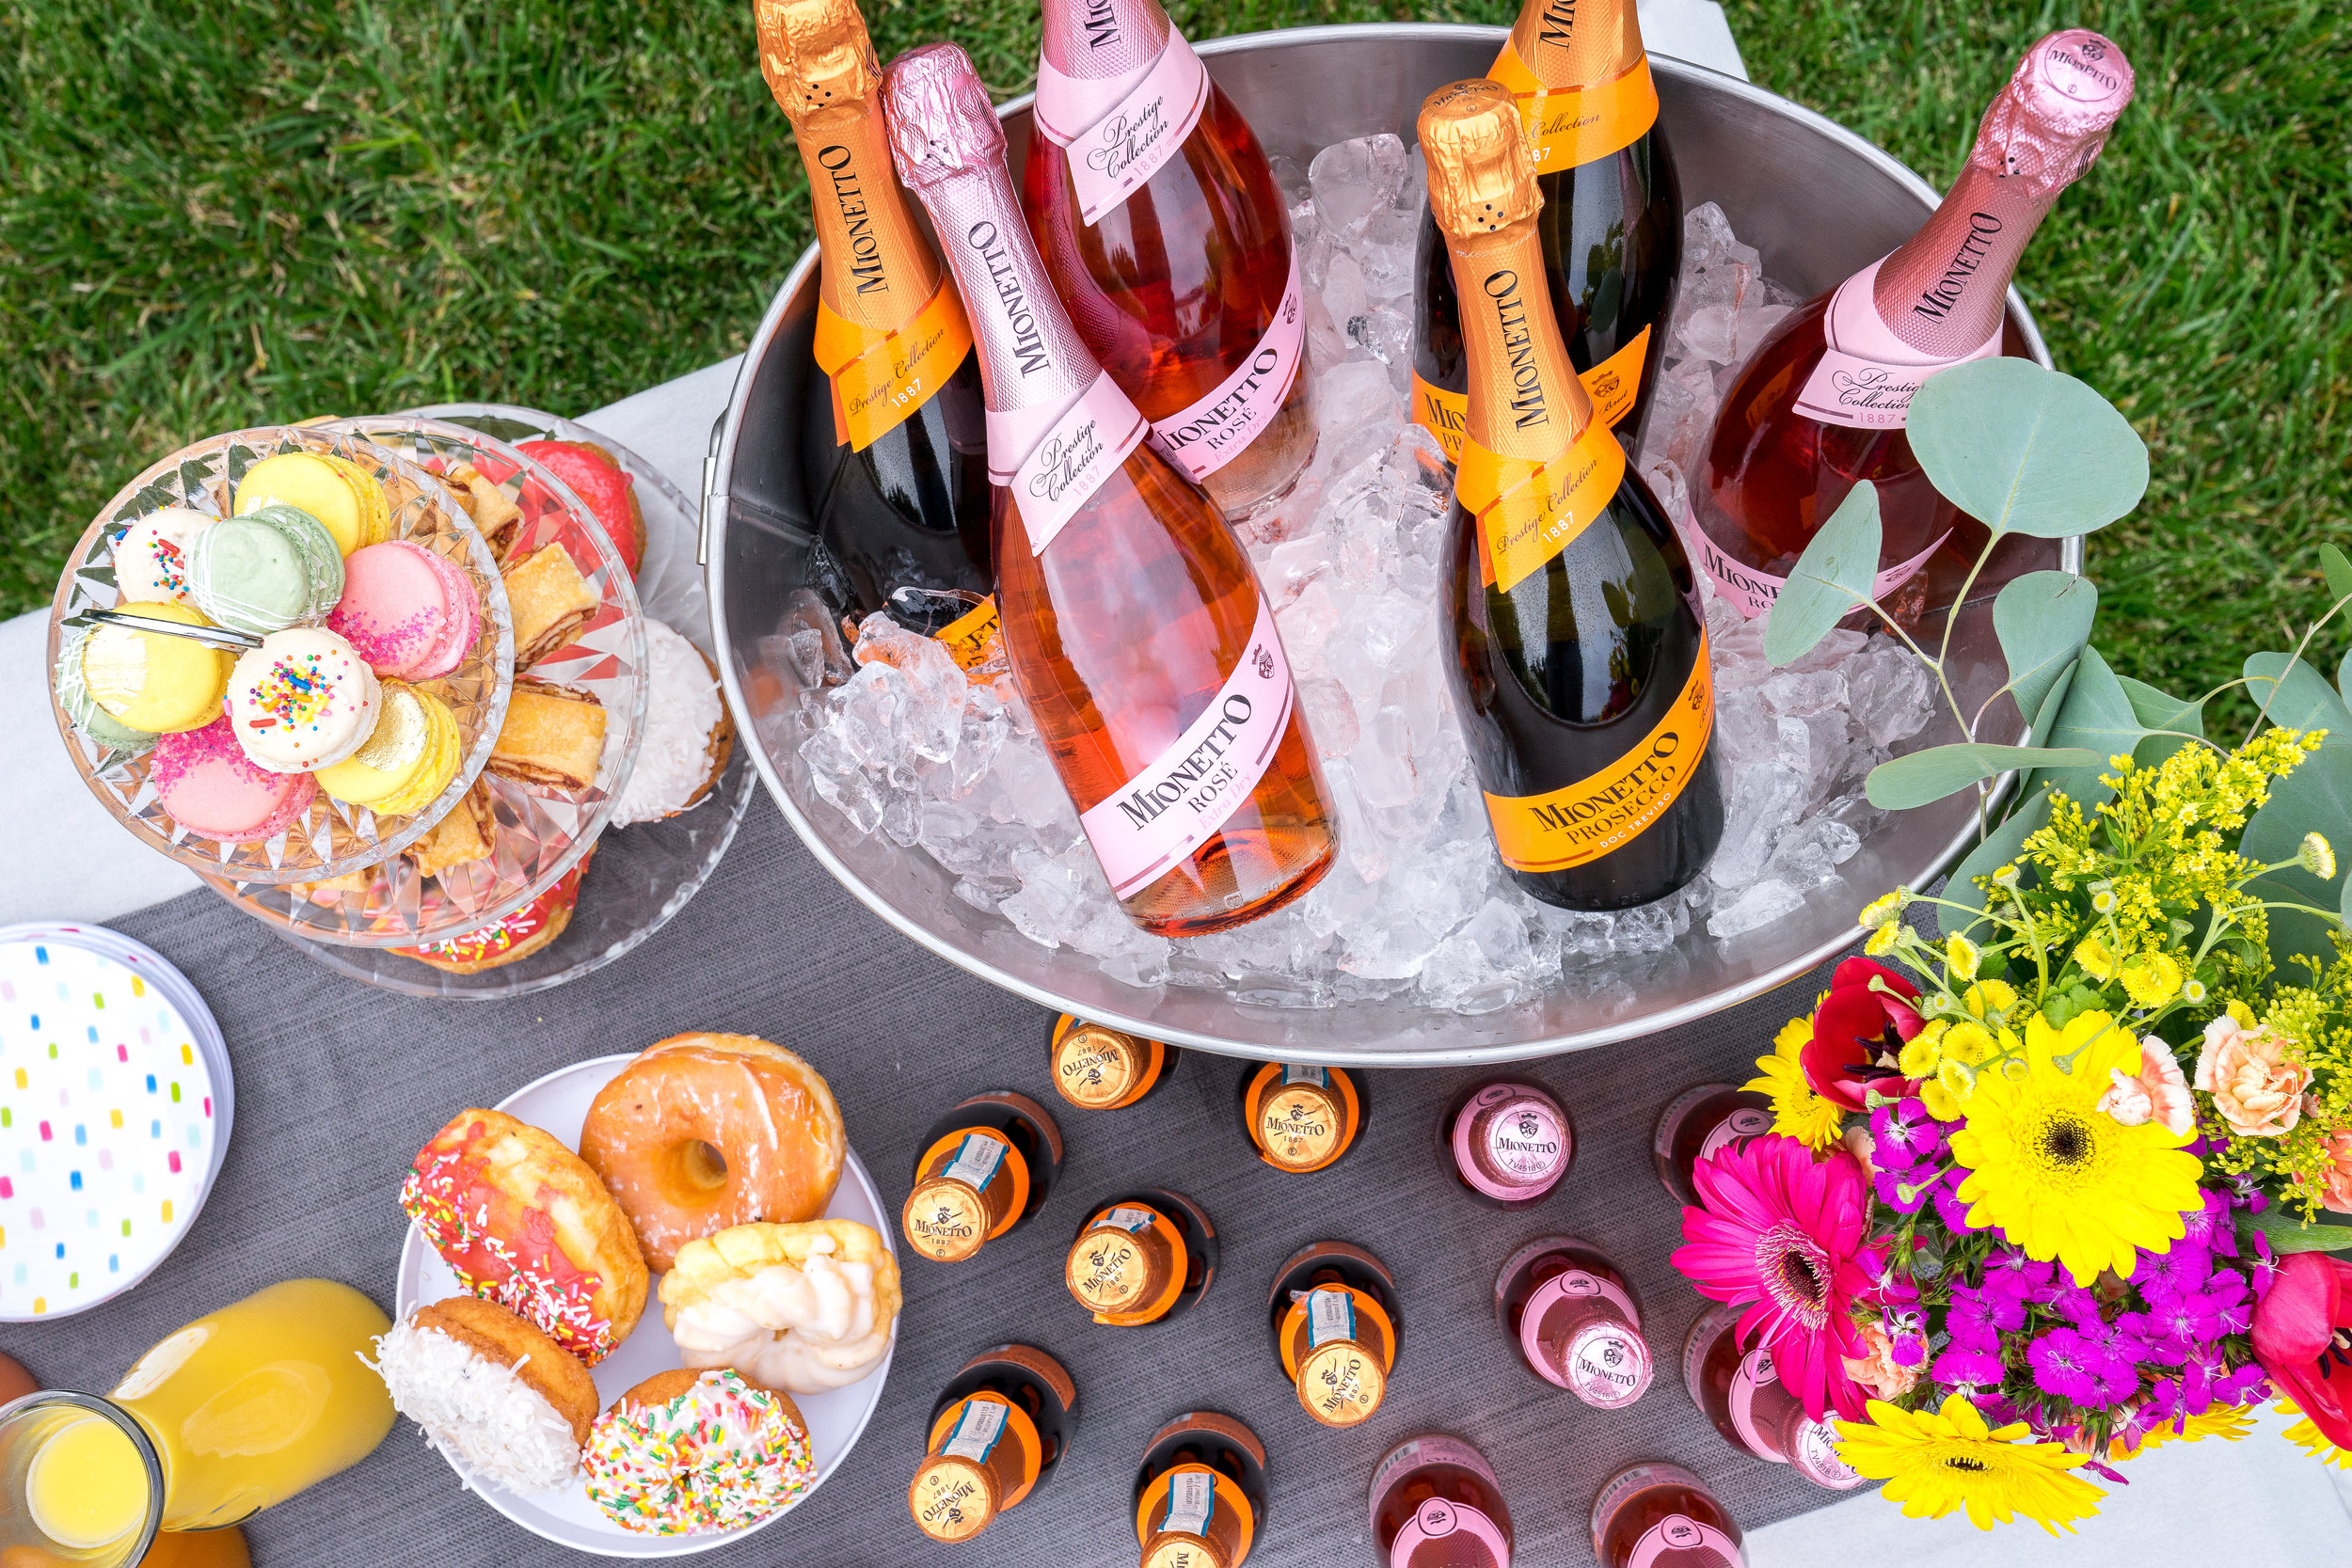
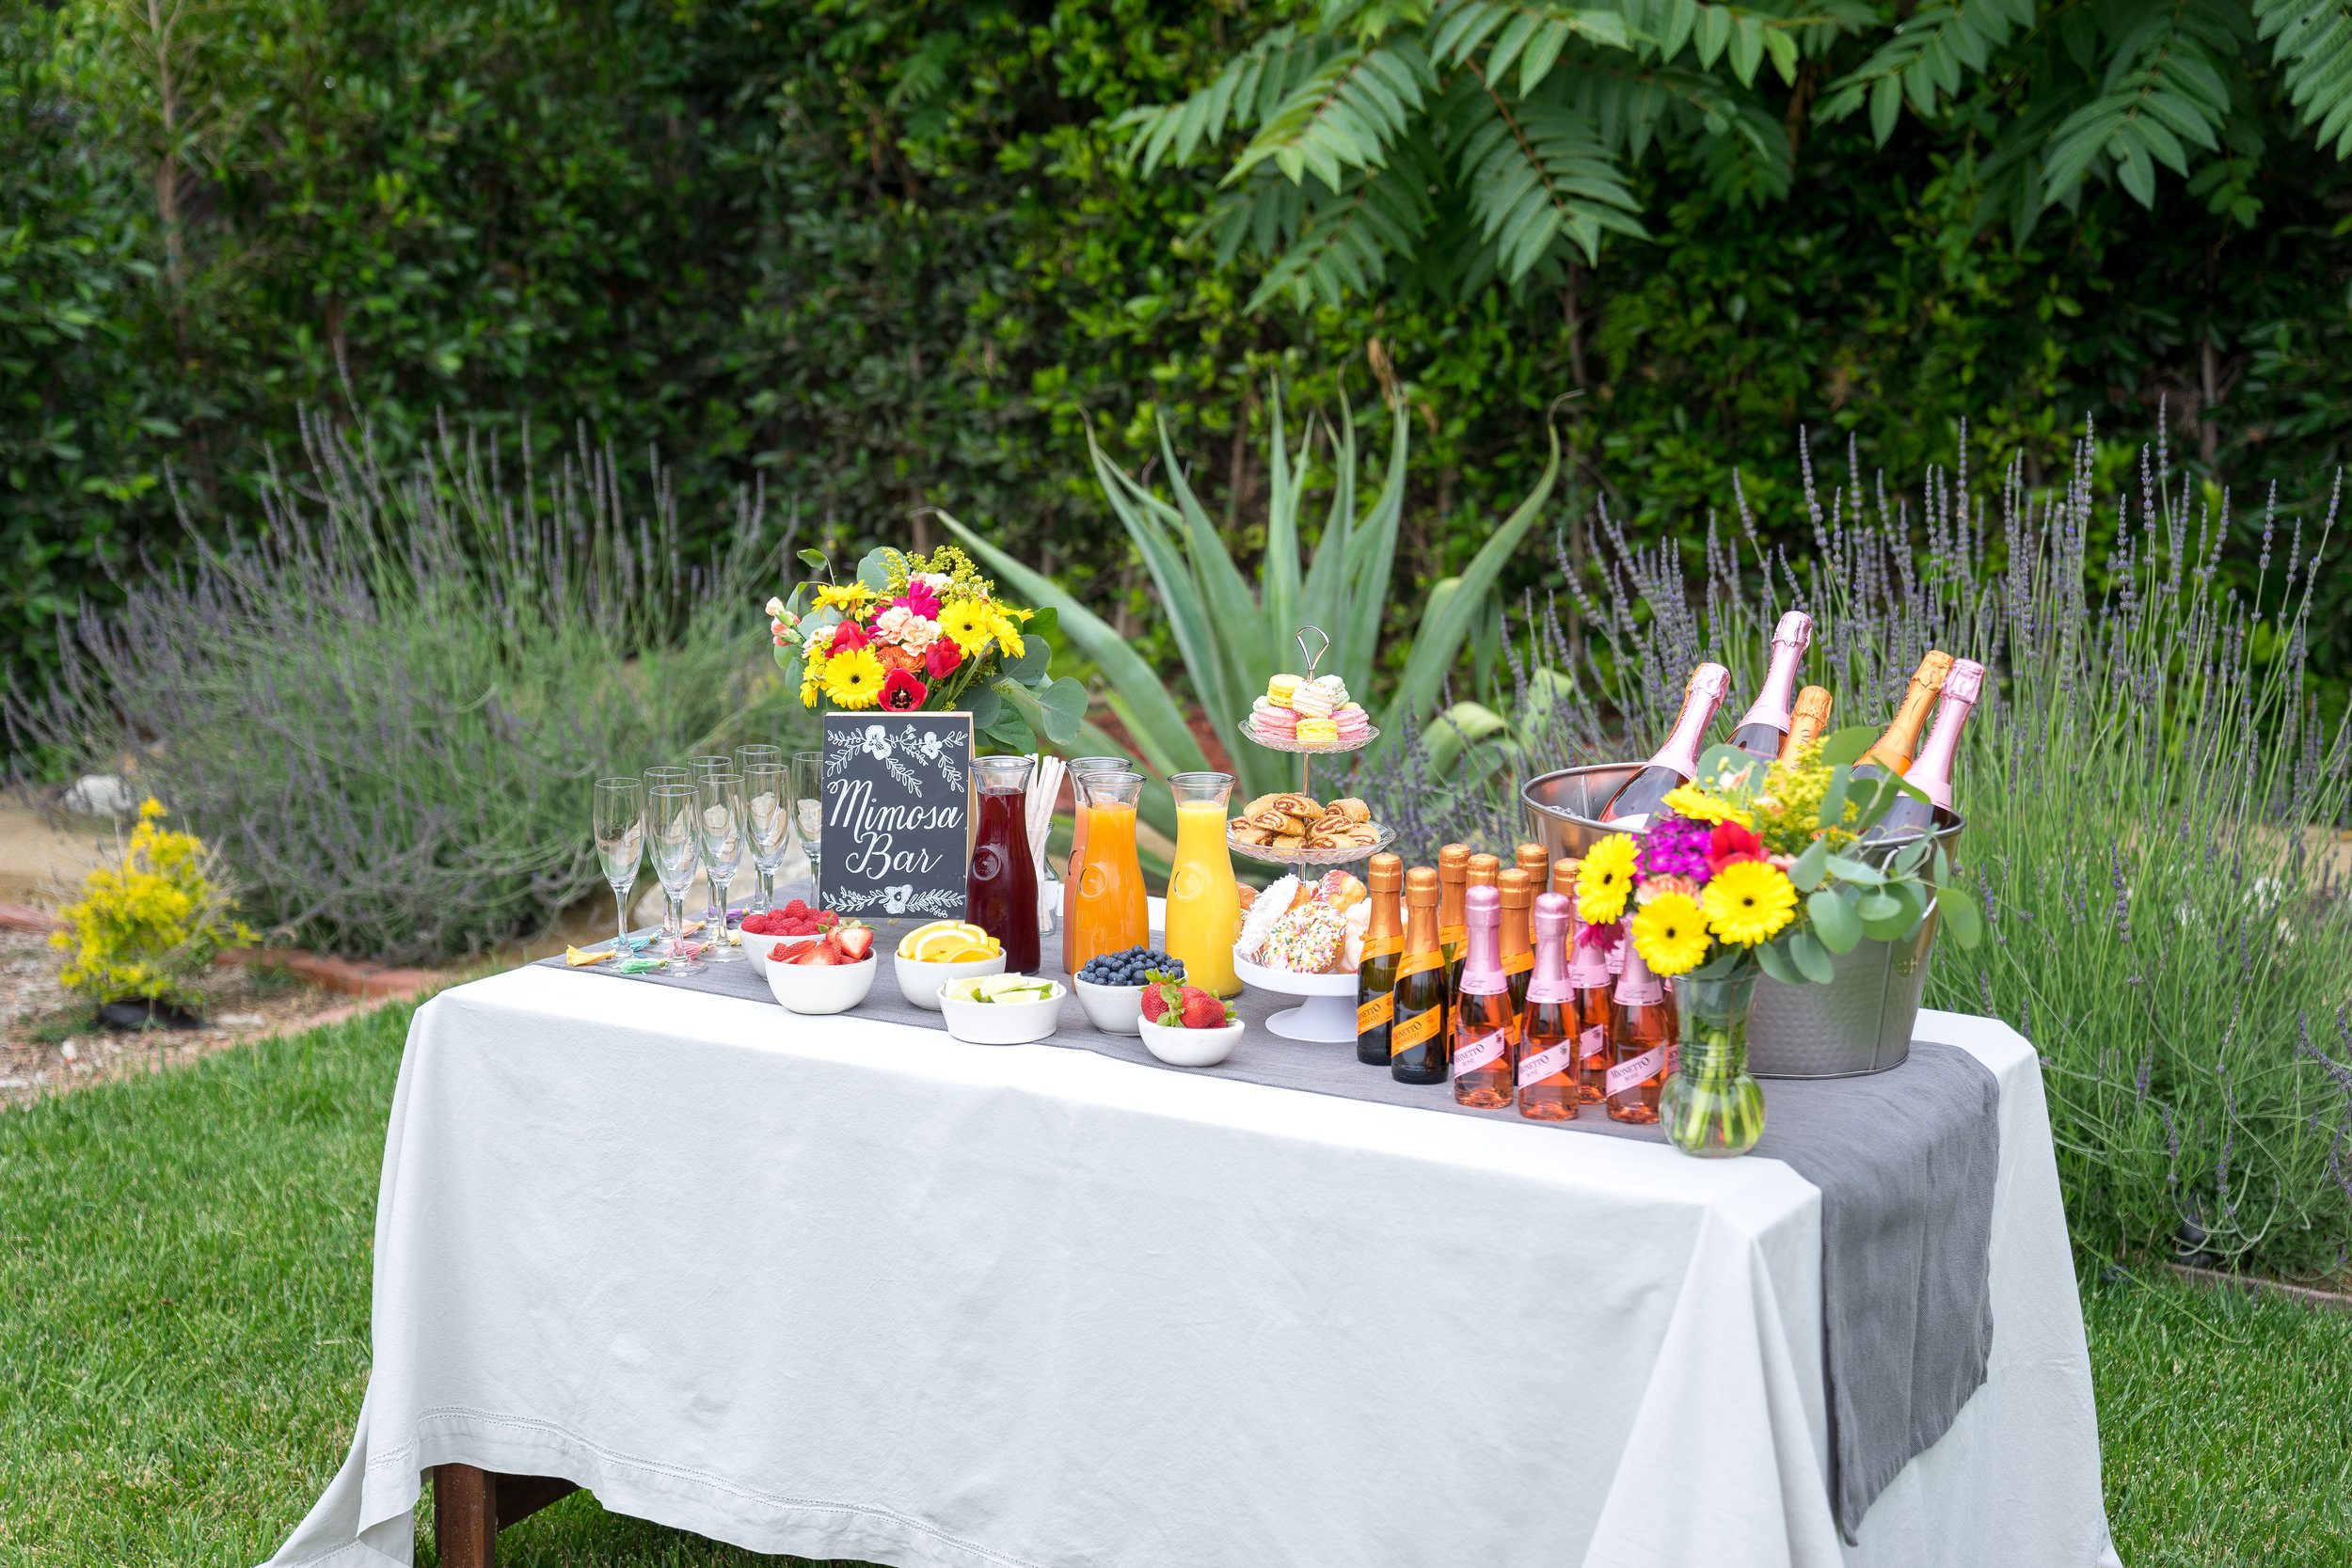
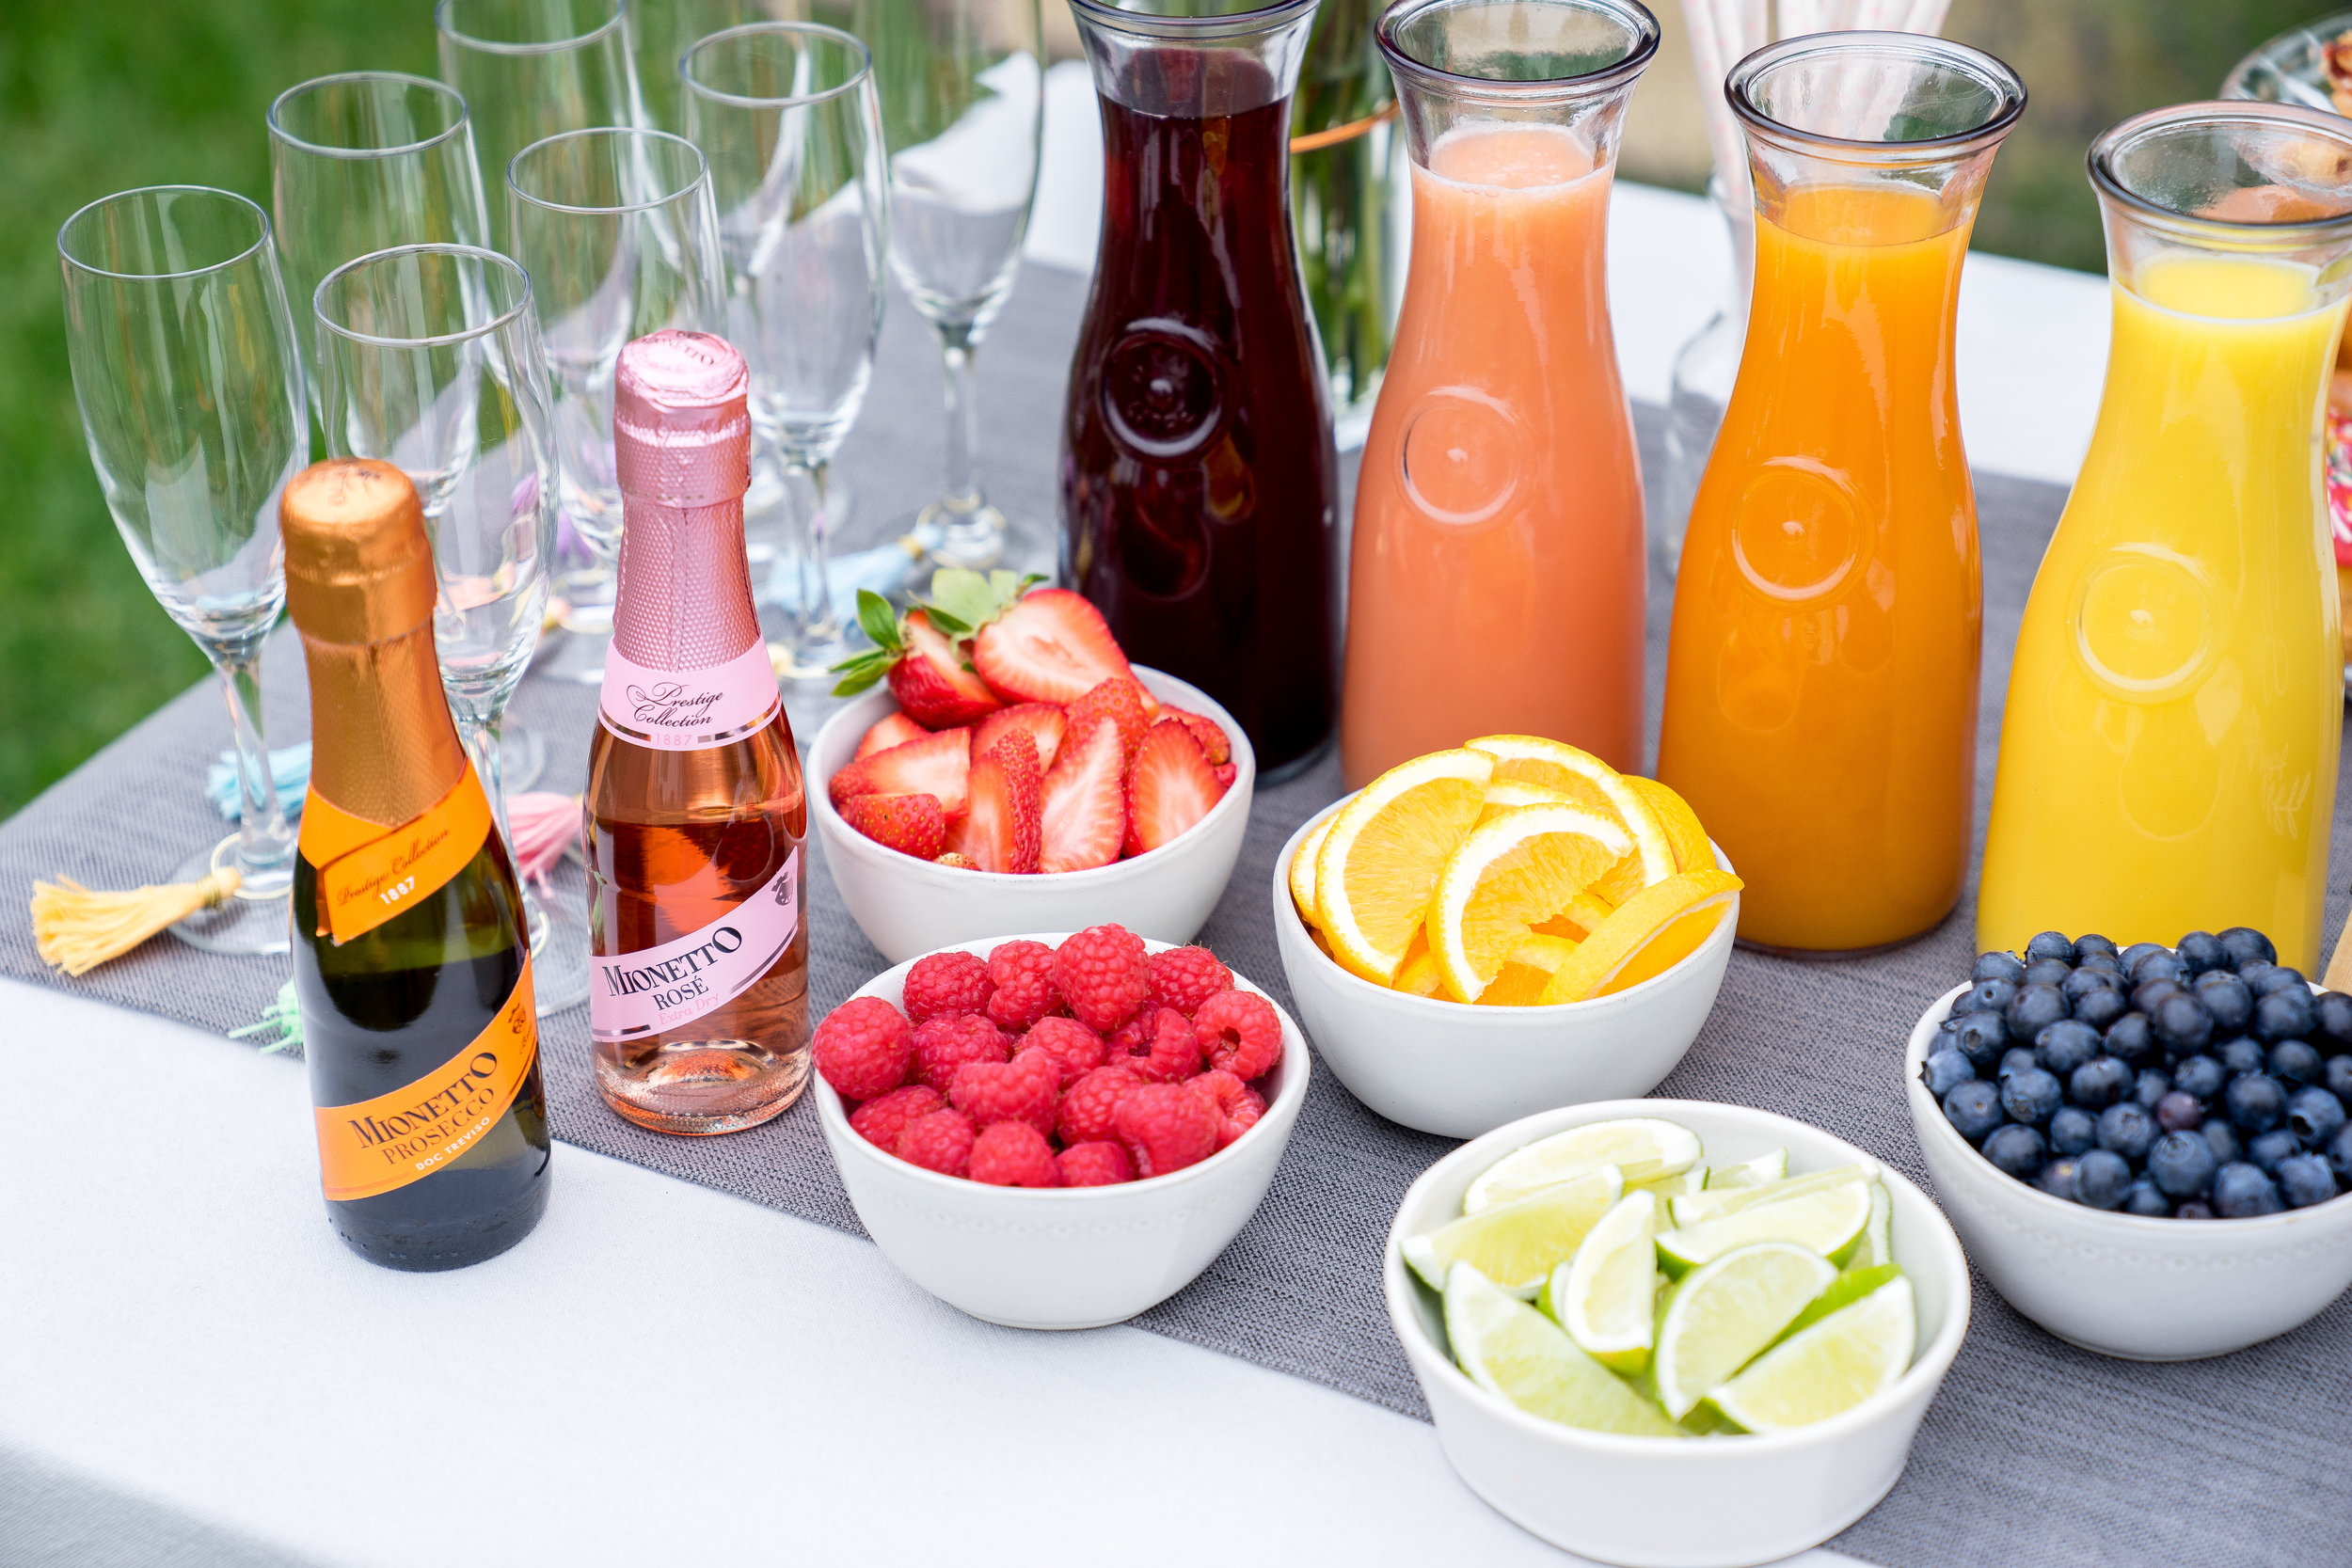
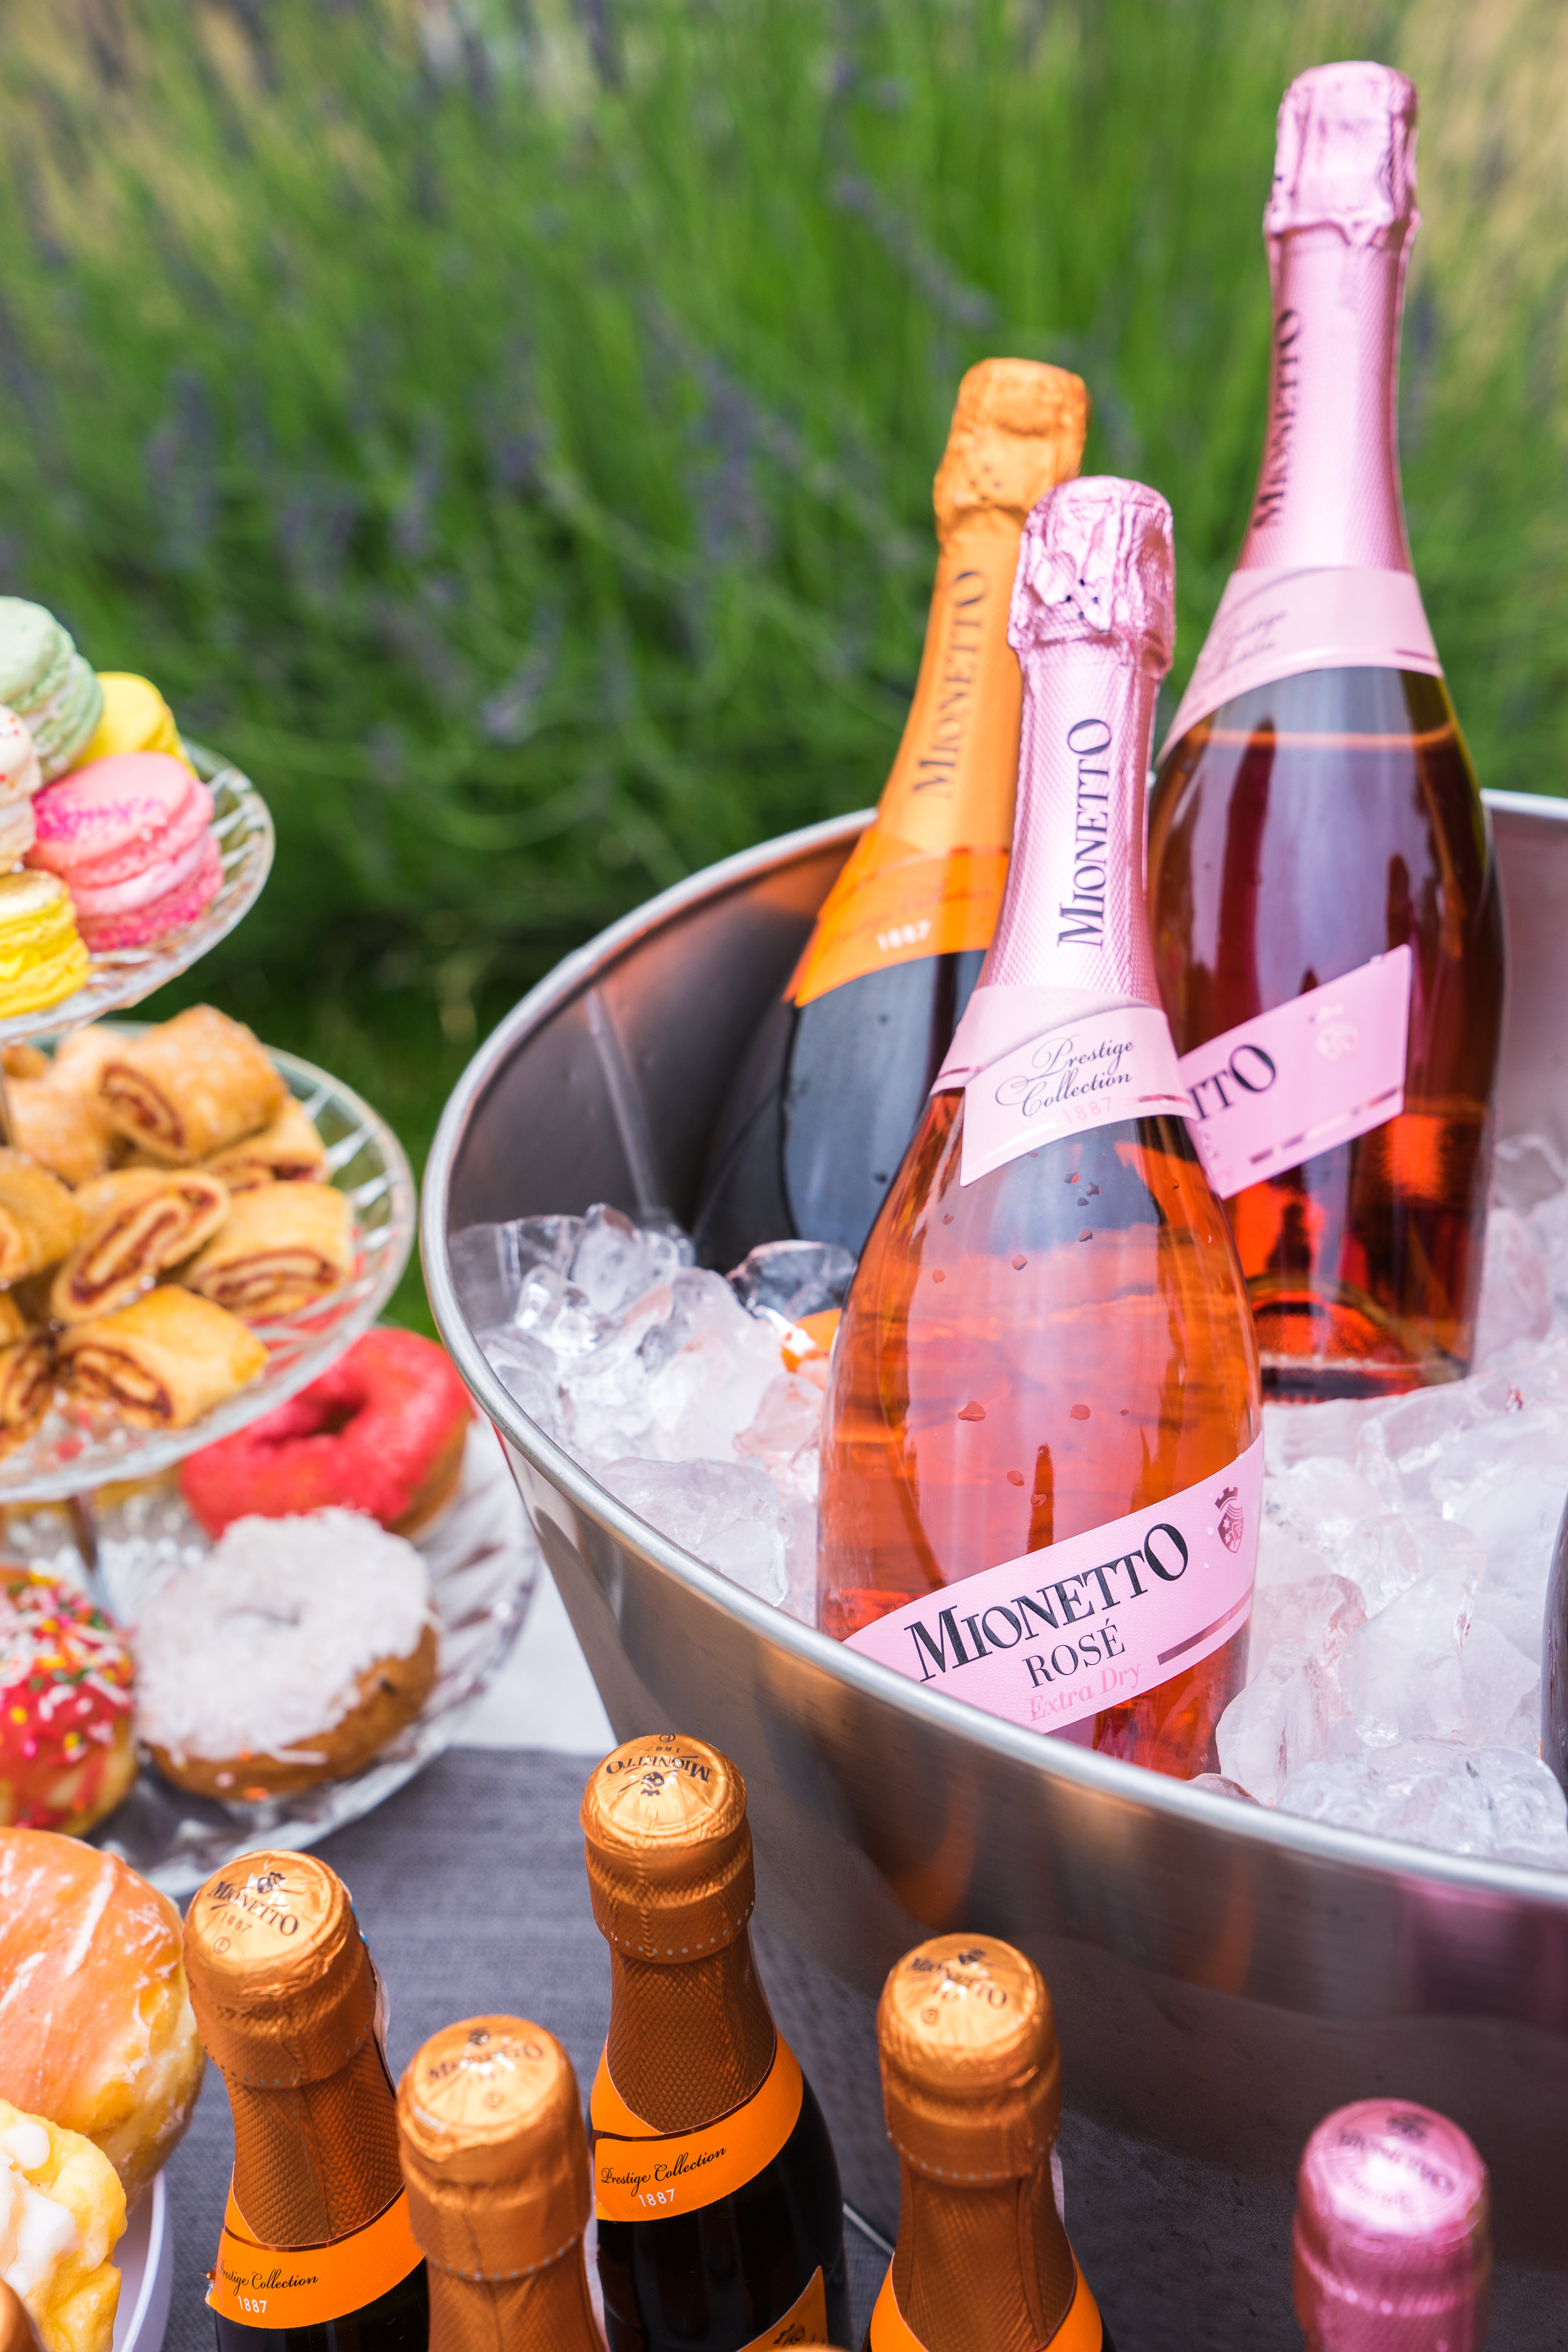
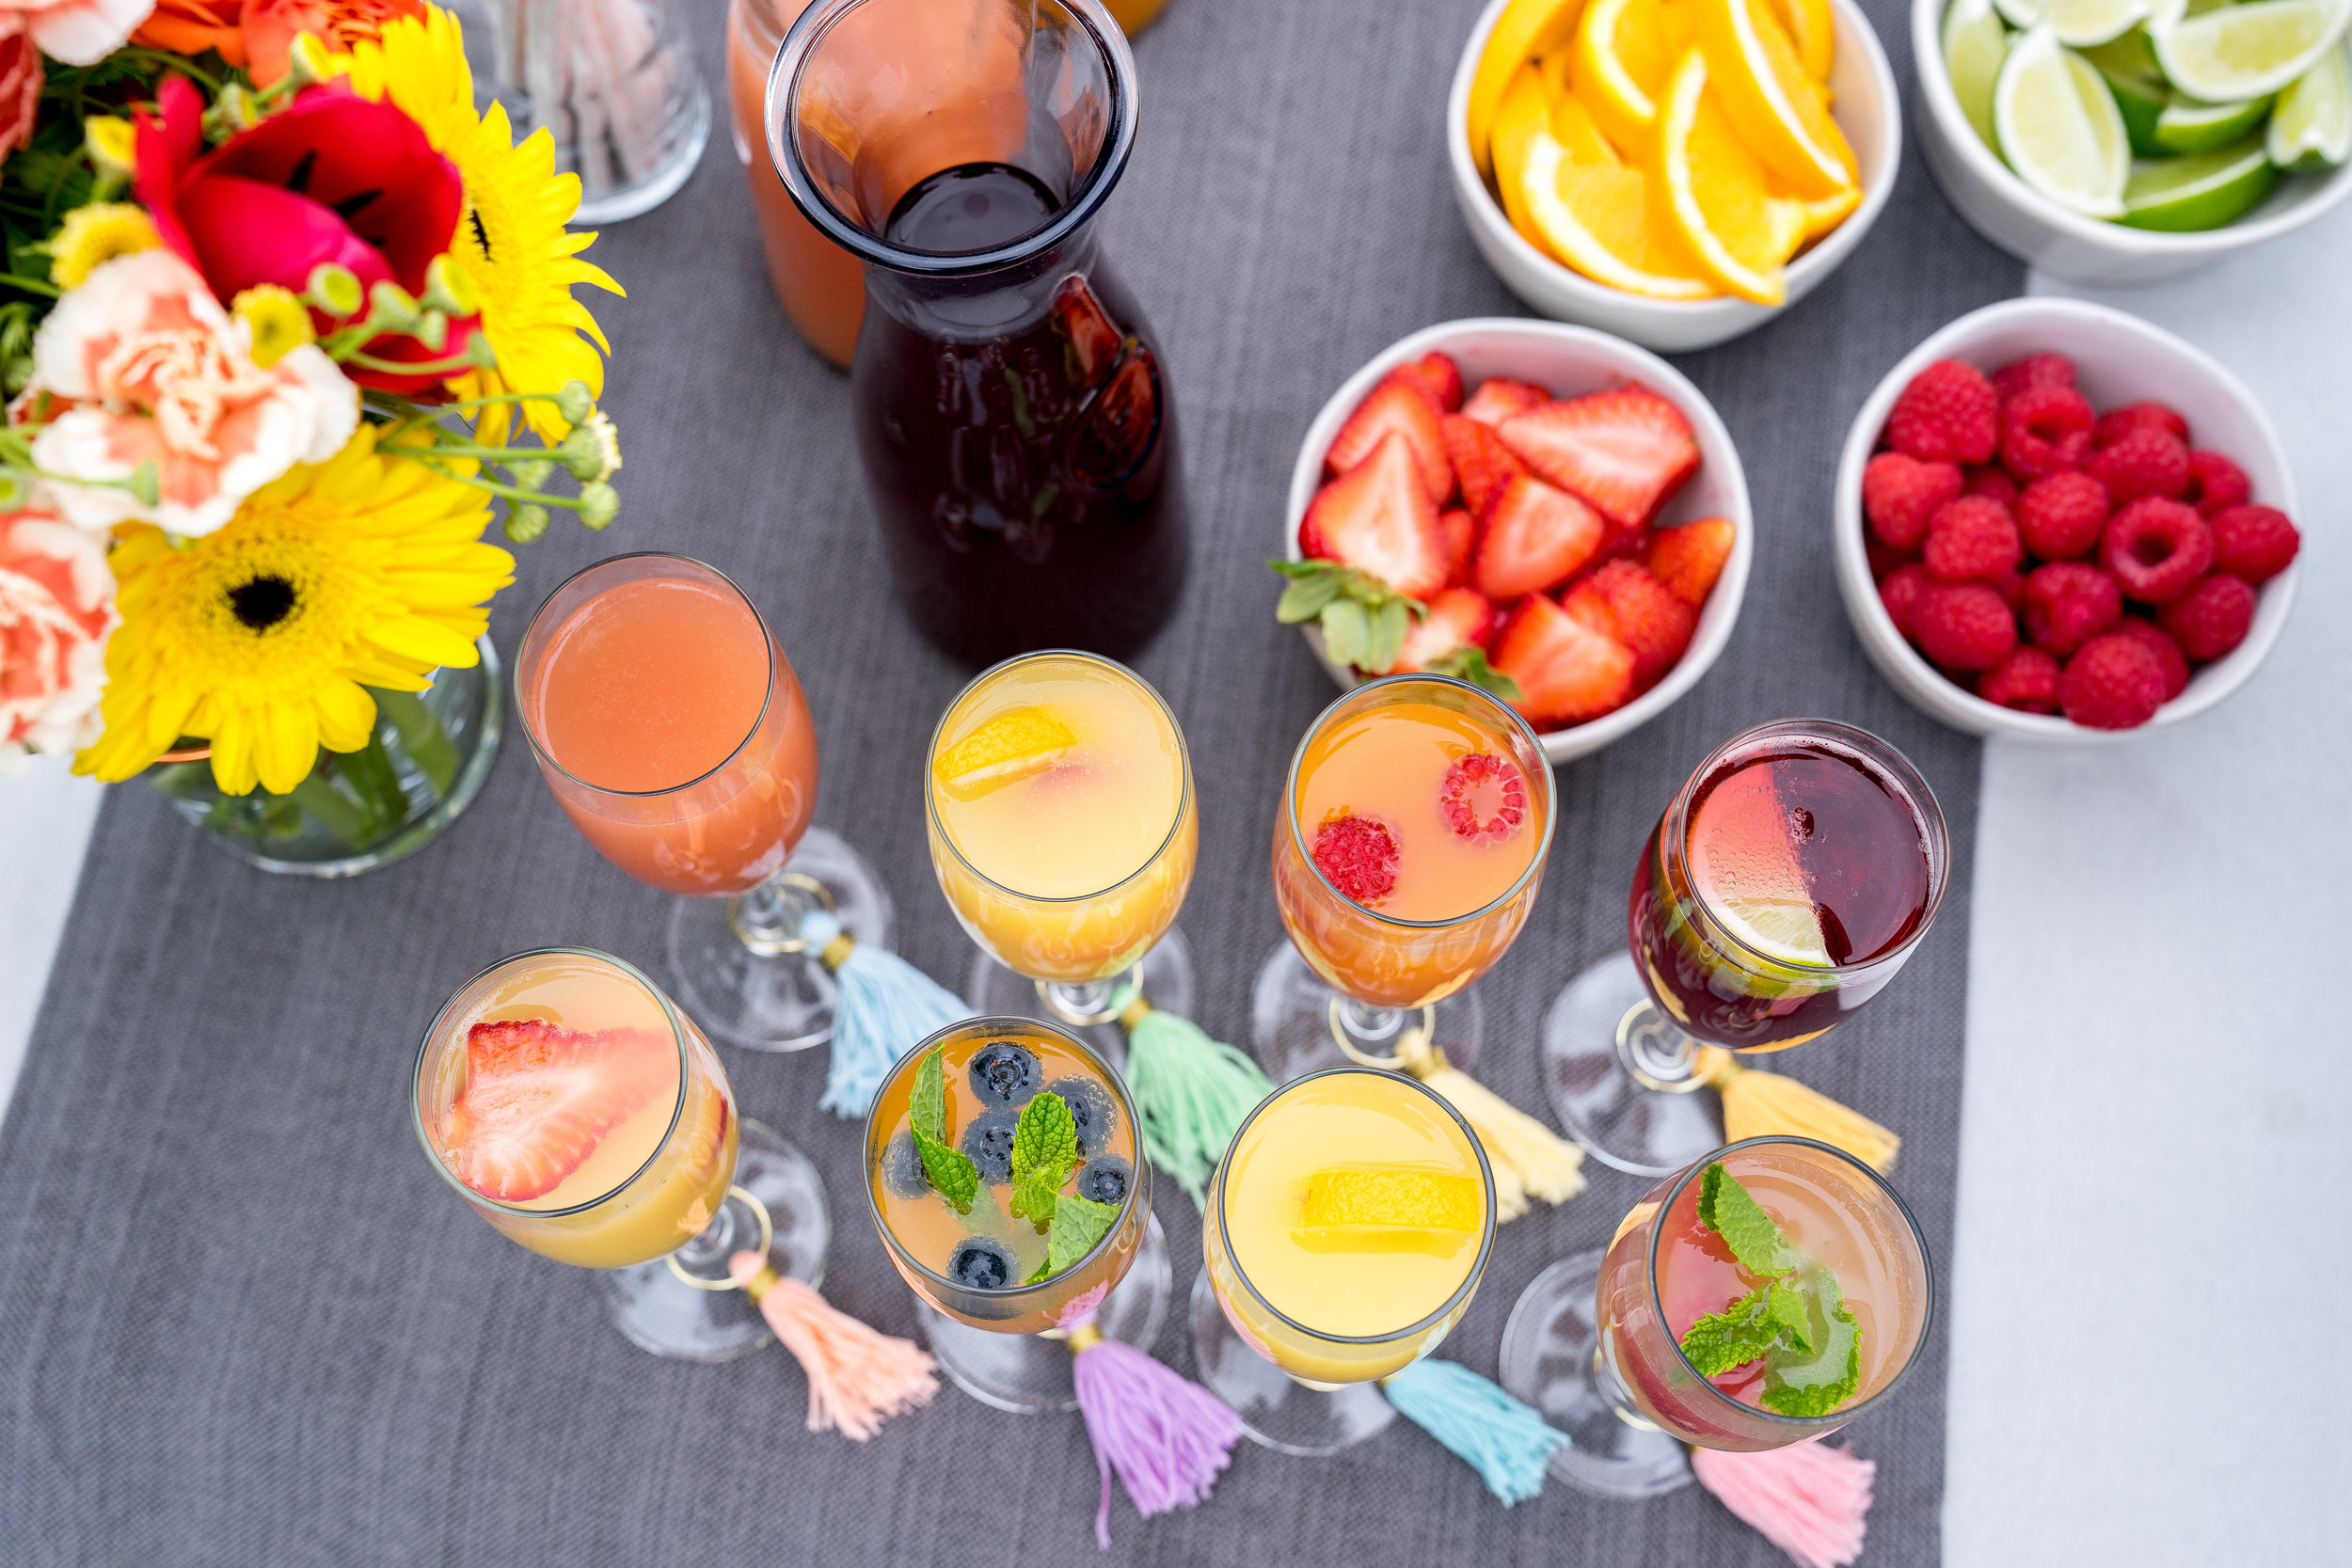
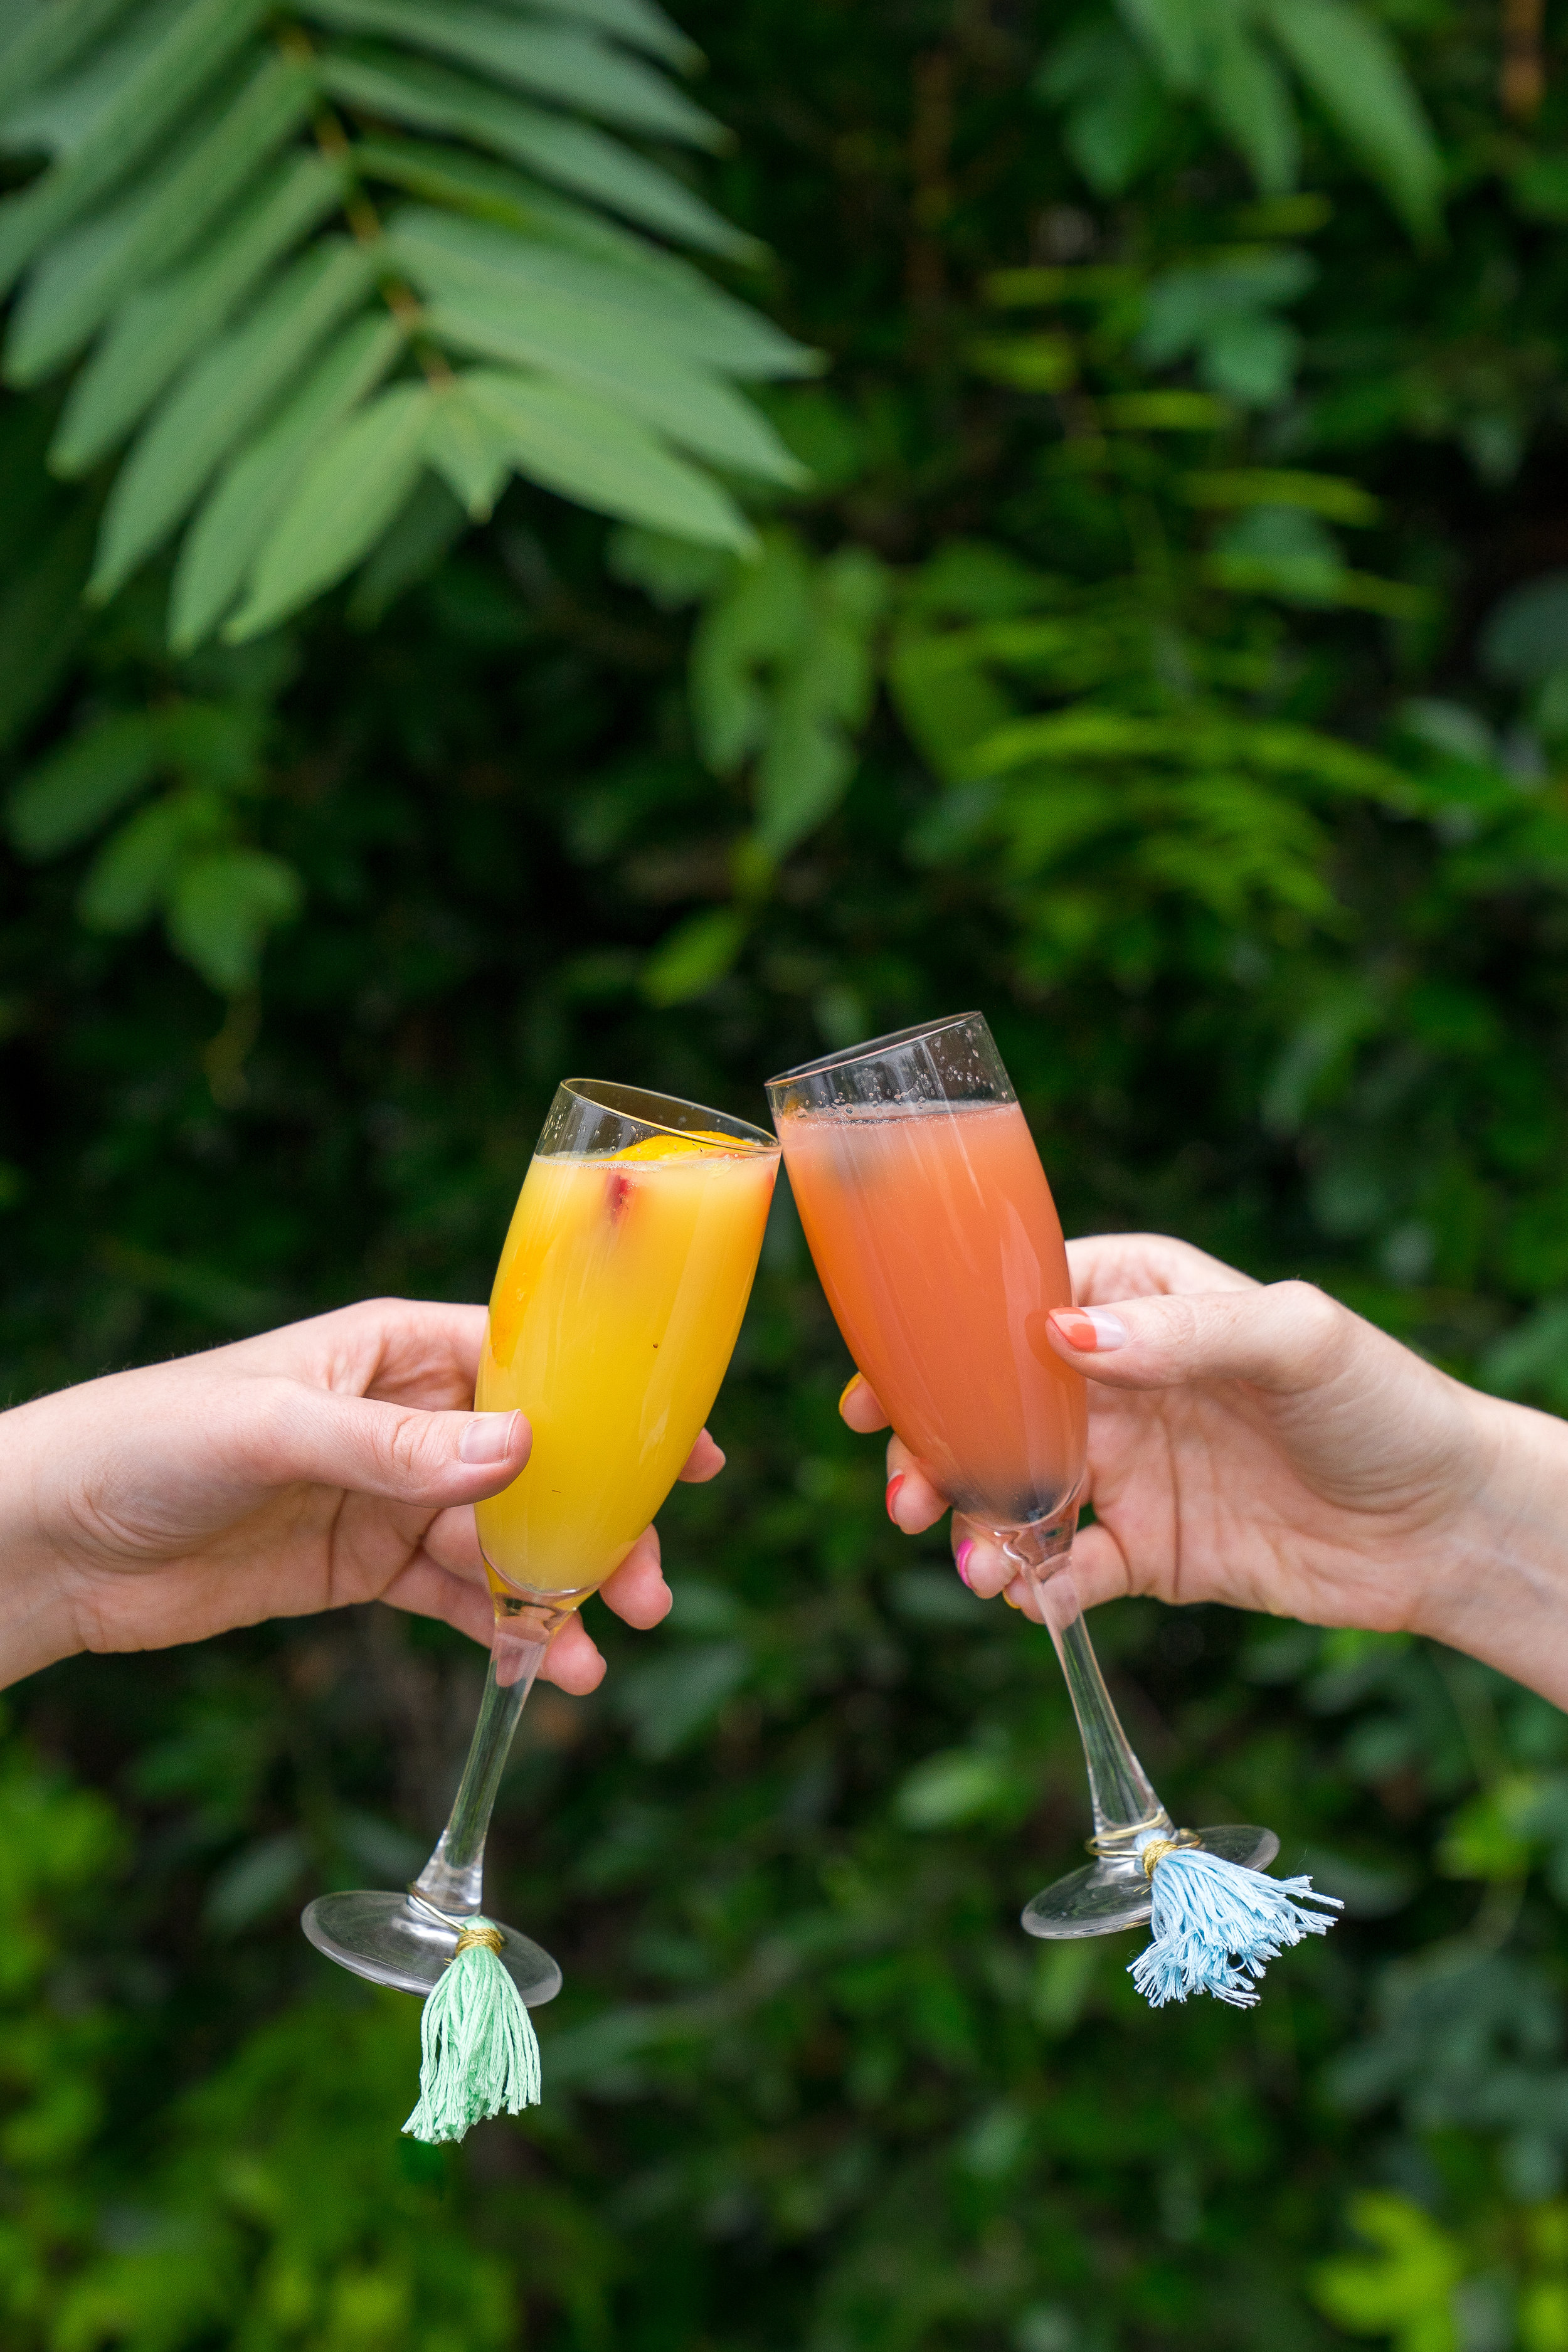
For our recent Mimosa Bar party, we knew we wanted to mix things up and offer a fun twist on the traditional mimosa (plain old orange juice and Champagne is just so expected, isn’t it?). To start, we turned to Mionetto’s Prosecco as the base for our bubbly bar (or should we say... #MioMosa bar? FYI, Mio in Italian means “My,” and that’s what MioMosa is all about – My Mionetto Miomosa is a personalized creation made entirely your way). And yes, we love the crisp, dry bubbly on its own, but it’s truly special when paired with a splash of fresh, tangy fruit juice and some colorful fruit garnish. And while we couldn’t in good conscience skip the old-standby OJ entirely, we knew we wanted to offer a variety of juices for our guests to choose from when concocting their cocktails - so we created a rainbow of juice around the orange with carafes of cranberry, grapefruit, and mango-orange juices. To round out the offerings, we stocked our little bar with a full spectrum of berries and citrus fruits. The cocktail-crafting possibilities were endless!

Build-Your-Own-Mimosa Bar Party, featuring Mionetto Prosecco - Brunchographers

Build-Your-Own-Mimosa Bar Party, featuring Mionetto Prosecco - Brunchographers

Build-Your-Own-Mimosa Bar Party, featuring Mionetto Prosecco - Brunchographers

Build-Your-Own-Mimosa Bar Party, featuring Mionetto Prosecco - Brunchographers

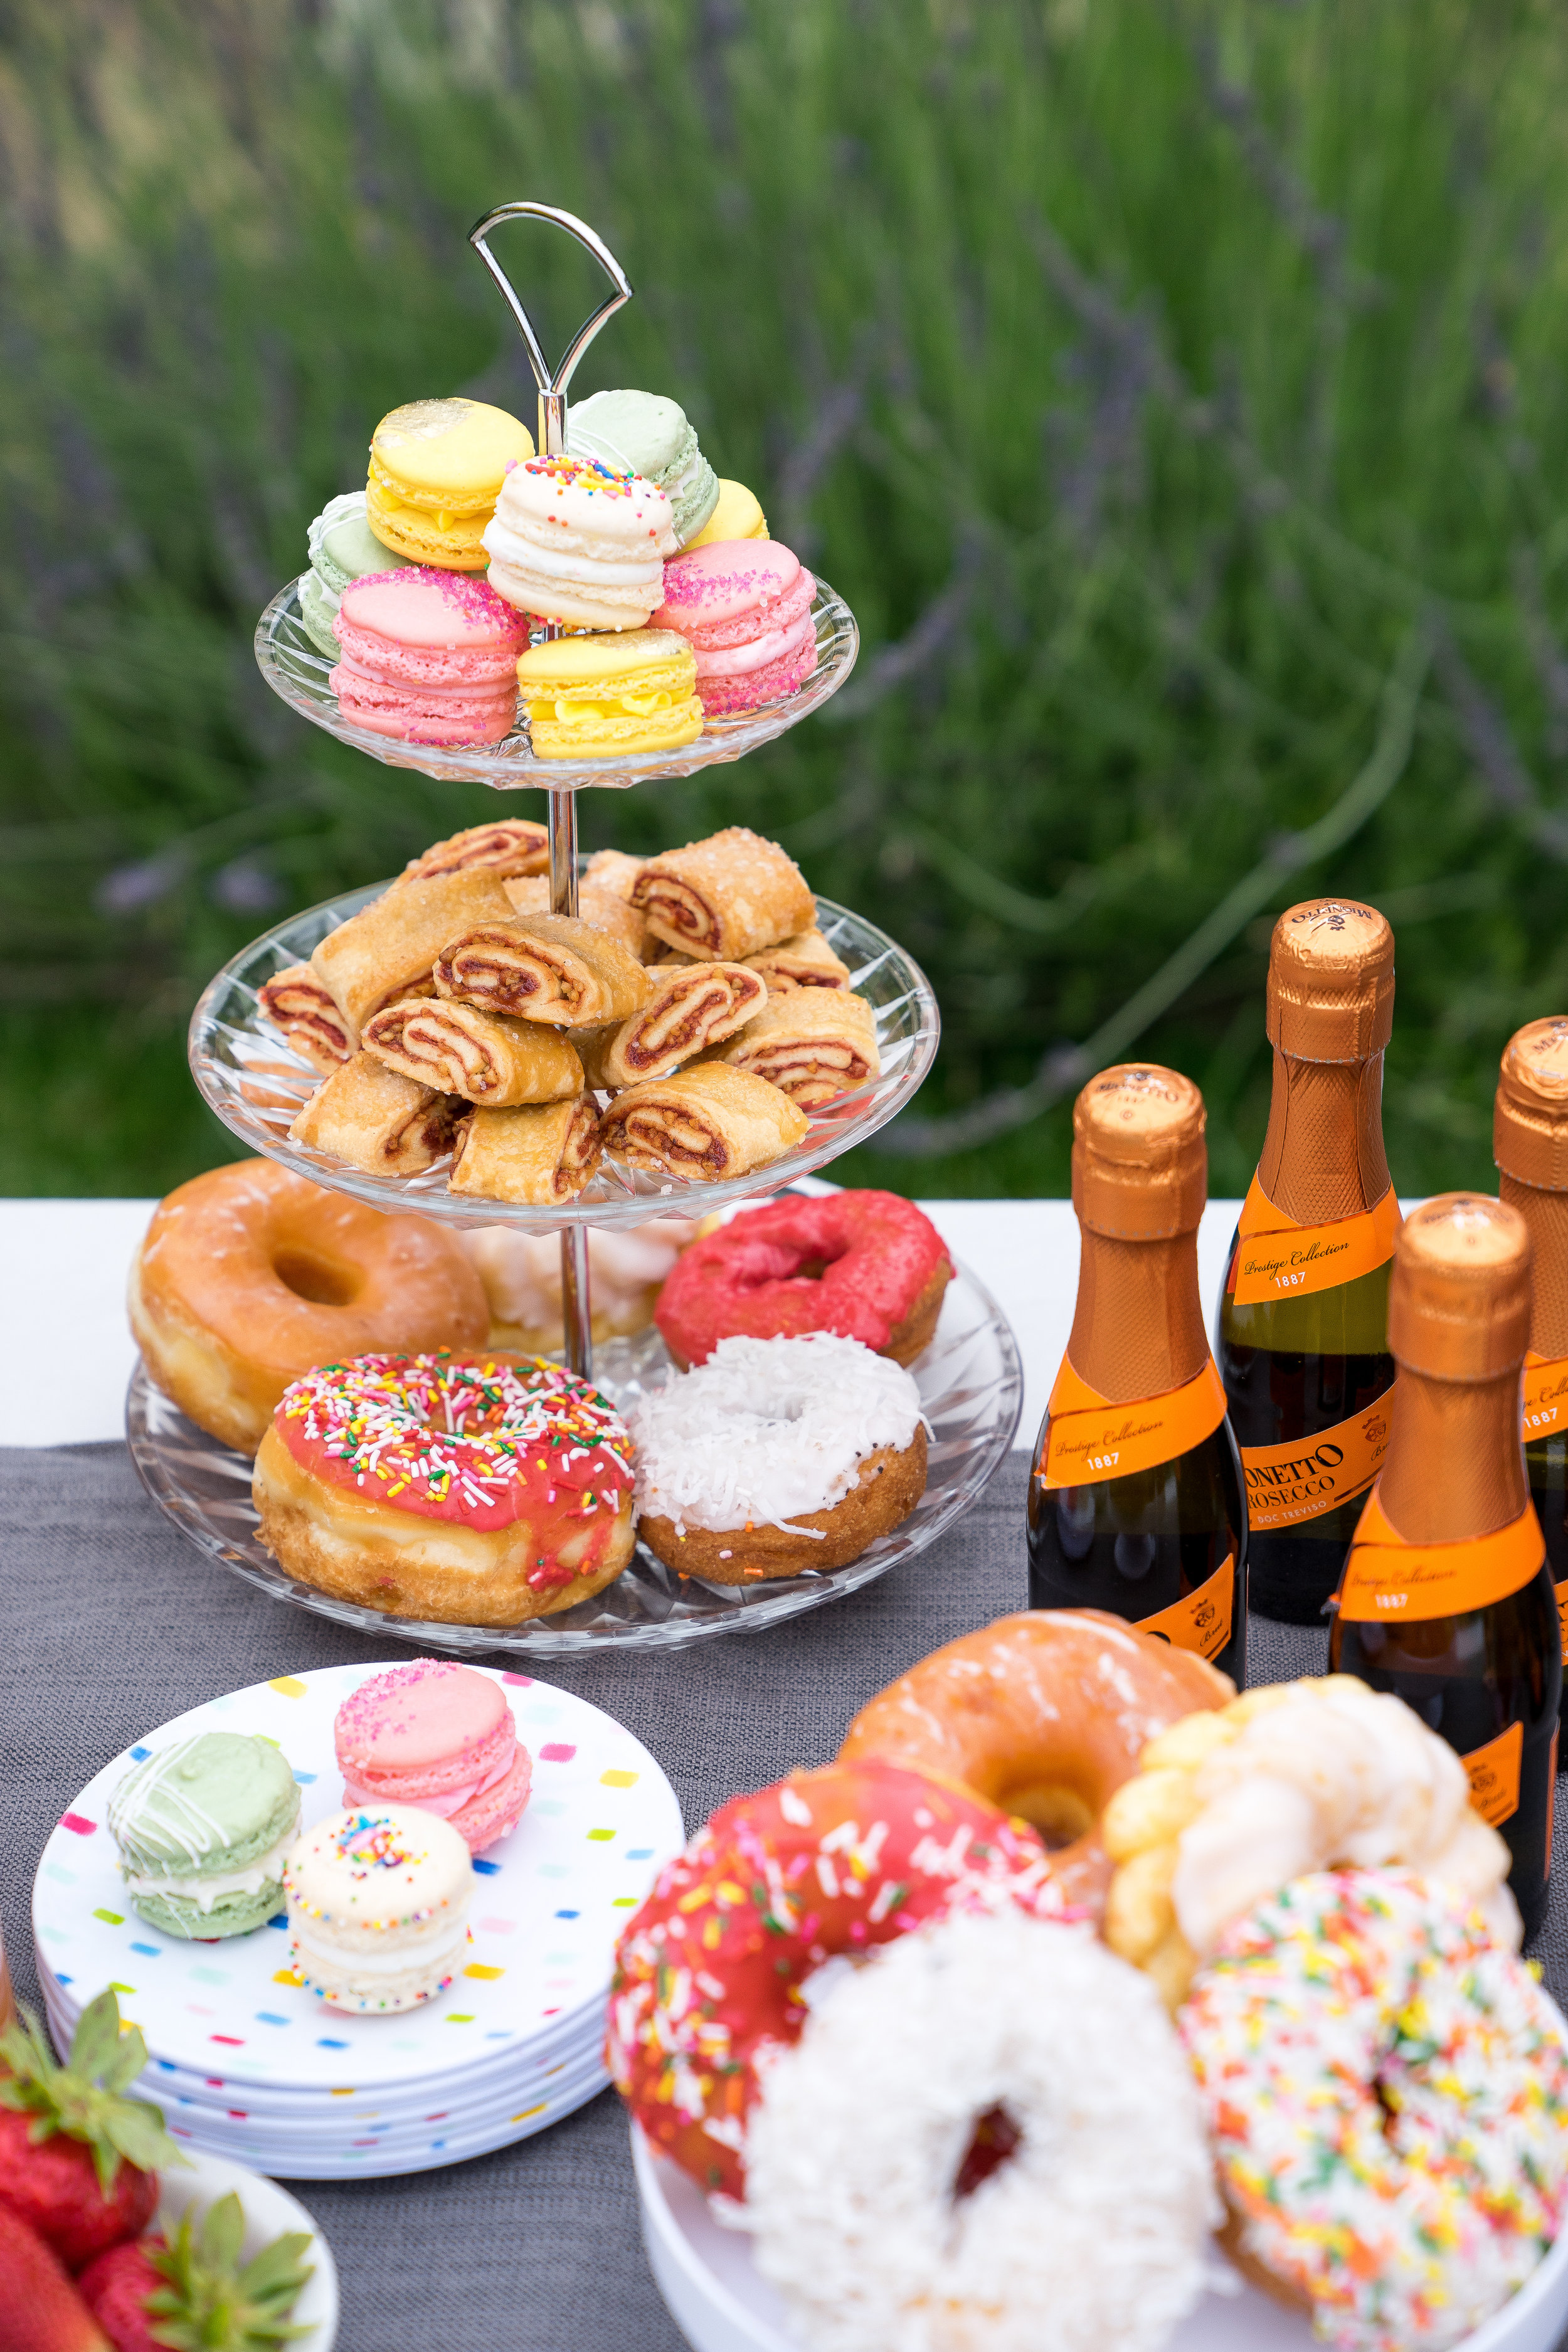
And because no responsible brunch host would serve only Mimosas, we made sure to stock our bar with some snacks and treats as well, sticking steadfastly to our rainbow theme. We plucked pretty little macarons from a local bakery, set out some delicious and not-too-sweet raspberry rugelach, and piled cake stands high with donuts from our favorite neighborhood shop (Donut Hut in Burbank, if you were curious). Did we have a sugar high afterward? Yes we did. Did we care? Decidedly not.

Build-Your-Own-Mimosa Bar Party, featuring Mionetto Prosecco - Brunchographers

Build-Your-Own-Mimosa Bar Party, featuring Mionetto Prosecco - Brunchographers

Are you hoping to throw a MioMosa party of your own this summer? Here's a bit of our best advice for building your very own beautiful (and delicious) Mimosa bar:

1. Start with the good stuff. Find a bubbly wine that you’d enjoy just as much when sipped on its own, and that’s not so sweet that it couldn’t stand up to a little added juice. For us, that was Mionetto Prosecco - Johnna’s favorite is the Rosé Extra Dry, while Veronica prefers the DOC Treviso Brut. Find your favorite and introduce it to your friends!

Build-Your-Own-Mimosa Bar Party, featuring Mionetto Prosecco - Brunchographers

Build-Your-Own-Mimosa Bar Party, featuring Mionetto Prosecco - Brunchographers

Build-Your-Own-Mimosa Bar Party, featuring Mionetto Prosecco - Brunchographers

Build-Your-Own-Mimosa Bar Party, featuring Mionetto Prosecco - Brunchographers

2. Get creative with mixers. Whether you take inspiration from classic cocktail combinations (cranberry + lime, anyone?), seasonal fruits and veggies, or a juice from your favorite juice bar, remember to think outside the classic mimosa! There’s a whole world of flavor combinations to choose from, and your guests will appreciate an opportunity to show their creativity.

3. Pick a color theme. Any party table will look best when a color theme is kept in mind, especially if you can carry that theme all the way through the food and drink you serve! We knew our Prosecco bottles would be orange and pink, so we chose a rainbow theme that emphasized yellow, orange, and pink.

Build-Your-Own-Mimosa Bar Party, featuring Mionetto Prosecco - Brunchographers

Build-Your-Own-Mimosa Bar Party, featuring Mionetto Prosecco - Brunchographers

Build-Your-Own-Mimosa Bar Party, featuring Mionetto Prosecco - Brunchographers

Build-Your-Own-Mimosa Bar Party, featuring Mionetto Prosecco - Brunchographers

4. Add some pretty details. Finally, for those who are crafting-inclined, consider tying your party spread together with a few charming, handmade touches. For this party, Johnna lent her calligraphy skills to create a gorgeous chalkboard sign, while Veronica got crafty with some colorful floral arrangements. And to help guests tell whose glass was whose, we made some quick little tassel charms in our color scheme and attached them to the champagne flutes. For us, these little projects were just the right level of Martha-ness - try spending a few minutes on Pinterest to find the perfect project for you!

This post was graciously sponsored by Mionetto USA. As always, all opinions are our own!

July 03, 2019 /Brunchographers
At Home, Entertaining, Parties, Bottomless Mimosas
At Home
1 Comment
Chocolate Mocha Power Parfaits Recipe by Brunchographers

Chocolate Mocha Power Parfaits Recipe by Brunchographers

Chocolate Mocha Power Parfaits

December 31, 2018 by Veronica Kablan in At Home

Friends, tomorrow is a new year. The holidays are over. 2018 has come to a close. And do you know what that means? It’s time to pay penance for all those Christmas cookies we devoured over the last month, and clean up our dietary acts.

This year, I’m resetting my eating habits and focusing on gut health with the help of internet nutrition guru Robyn Youkilis, whose recipes and meal plans support the digestive system with healthy, probiotic-rich foods, like fermented vegetables, kombucha, and yogurt. My favorite recipe thus far is what Robyn calls the “Power Parfait,” which combines yogurt, oats, chia seeds, and protein powder to create a delicious, nutrient-packed breakfast that is super easy to assemble, and can be make in big batches for the entire week. It kind of feels like dessert, really, which makes “cleaning up your act” feel more like fun and less like torture (especially this version, which uses a chocolate-mocha flavored protein powder - yum).

Chocolate Mocha Power Parfaits Recipe by Brunchographers

Chocolate Mocha Power Parfaits Recipe by Brunchographers

Fortunately, our friends at Milk & Eggs carry tons of amazing healthy products that will fit in with just about any New Year’s resolution - whether that’s focusing on gut health (like me), following a specific diet, or just incorporating more whole foods into your daily life. You’re covered.

Be sure to check out Robyn’s original Power Parfait recipe, because it’s super customizable and fun to play with. And if you do, let us know what you come up with!

Chocolate Mocha Power Parfaits Recipe by Brunchographers

Chocolate Mocha Power Parfaits Recipe by Brunchographers

Chocolate Mocha Power Parfaits

Serves 2

Ingredients:
1 cup plain, unsweetened yogurt of choice (we love Kite Hill)
1 package chocolate mocha protein powder
1/2 cup quick-cooking oats
2 tbsp chia seeds
1/4 cup unsweetened almond milk

Toppings:
1/2 cup homemade granola
1 cup mixed fruit of choice, like berries, cherries, oranges, pomegranate
fresh mint
toasted sliced almonds

Method:

  1. Combine yogurt, protein powder, quick-cooking oats, chia seeds, and almond milk in a mixing bowl and stir until well combined. Place in the refrigerator to rest for 15 minutes or overnight (or, eat immediately if you’re in a hurry).

  2. Divide the mixture into two small bowls, and add toppings as desired. Have fun with it!

Recipe adapted from Robyn Youkilis

Chocolate Mocha Power Parfaits by Brunchographers

Chocolate Mocha Power Parfaits by Brunchographers

Groceries for this post were kindly provided by Milk & Eggs, our favorite grocery delivery service! All opinions are our own.  

December 31, 2018 /Veronica Kablan
Recipes, Parfaits, Yogurt, Healthy, At Home, Winter, new years
At Home
Comment
Star-Spangled Blueberry Banana Bread, Brunchographers

Star-Spangled Blueberry Banana Bread, Brunchographers

Star-Spangled Blueberry Banana Bread

July 03, 2018 by Veronica Kablan in At Home

Guys, it's taking all my willpower not to title this post "Star-Spangled BANANNER Bread." Everything I know about SEO is telling me that I really, really shouldn't, but everything I know about puns is telling me that I really, really should. Practicality wins again. 

Star-Spangled Blueberry Banana Bread, Brunchographers

Star-Spangled Blueberry Banana Bread, Brunchographers

Speaking of practicality, this recipe is oozing with it. Ok, maybe not the banana stars (which are excruciating to cut out, but make for an oh-so-festive touch on the Fourth of July), but everything else about it is exceedingly practical. For one, it's full of healthy ingredients that almost no one could argue with, and for another, you make the batter in your blender. That's right, you just dump all the ingredients in the blender and whizz to combine. And hey, if you're short on time, you can skip the banana stars. As my old pal Ben Franklin used to say, "employ thy time well, if thou meanest to gain leisure." So he'd understand if you skipped the stars. Nobody's calling you un-patriotic. 

Star-Spangled Blueberry Banana Bread, Brunchographers

Star-Spangled Blueberry Banana Bread, Brunchographers

Star-Spangled Blueberry Banana Bread 

Ingredients

3 ripe bananas, plus 2 more sliced or cut into star shapes for garnish (optional)
2 cups rolled oats
2 eggs
1/2 cup maple syrup
1 tsp baking soda
1 tsp vanilla extract
1 tsp salt
1 cup blueberries, fresh or frozen 

Method

1. Preheat the oven to 350 degrees F. Line a standard loaf pan with parchment paper, and lightly coat with cooking spray. 

2. Place bananas, oats, eggs, maple syrup, baking soda, vanilla, and salt into the blender, and blend until just combined. Be careful not to over-blend! Fold in blueberries gently with a rubber spatula. 

3. Pour batter into the prepared pan, and arrange banana stars or slices on top. Bake until a toothpick comes out clean, about 35-45 minutes. 

4. Let cool in loaf pan for 15 minutes, and then using the edges of the parchment, gently lift the loaf out of the pan and place it on a rack to cool. Cool completely before slicing. Serve with butter, jam, or almond butter. 

Recipe adapted from Delish

Star-Spangled Blueberry Banana Bread, Brunchographers

Star-Spangled Blueberry Banana Bread, Brunchographers

July 03, 2018 /Veronica Kablan
At Home, In The Kitchen, Baking, Holidays
At Home
2 Comments
Low-FODMAP Banana Pancakes, by Brunchographers

Low-FODMAP Banana Pancakes, by Brunchographers

Low-FODMAP Banana Nut Pancakes

May 13, 2018 by Veronica Kablan in At Home

Many of my most vivid memories revolve around food. I don't remember much of my childhood, most of it is a pretty blur now, but I can remember clearly my mom's banana-nut pancakes. I can see her whisking together a batch on a leisurely Sunday, while my dad and I lounged around the kitchen, still in our pajamas. Maybe we'd help her with mashing the bananas (even though she was really the best at that) or chopping up the frozen pecans that Grandpa had sent from Mississippi, while she started heating up the near-ancient griddle (which probably still makes perfect pancakes to this day). I remember how perfect those pancakes looked and smelled, how fluffy they were on the inside, and how satisfying each bite was - especially those bites that had a nice crunchy pecan inside. Pure, sweet, Sunday heaven. 

So with today being Mother's Day, and my mother being three thousand miles away, you can imagine how badly I might be missing her. And, how much I might be wishing for a plate of her banana-nut pancakes. While it's impossible to recreate those perfect pancakes of my childhood, I have found that this absurdly simple recipe can help satisfy my crazed banana-nut nostalgia. Better yet, I've adapted it to meet my current low-FODMAP diet needs (more about that here), and even better yet, you can make this in your blender, so cleanup is a snap. 

I like using buckwheat flour here when I have it on hand, because I enjoy its earthy, nutty quality. Feel free to sub out another type of flour if you'd prefer. Walnuts are a classic partner to banana, and I like them in my pancakes, but you could also use pecans (which would be more faithful to my mother's version), hazelnuts, or whatever you have on hand. Maybe even chocolate chips, if you're feeling wild! Treat yourself - it's Mother's Day, after all! 

low-FODMAP Banana Pancakes, by Brunchographers

low-FODMAP Banana Pancakes, by Brunchographers

Ingredients

  • 1 cup gluten-free rolled oats 
  • 1/2 cup buckwheat flour 
  • 1 tsp baking powder
  • 1/2 tsp ground cinnamon 
  • 1/4 tsp salt 
  • 2 unripe bananas*
  • 2 eggs
  • 1/2 cup unsweetened almond milk 
  • 2 tbsp maple syrup**
  • 2 tbsp melted butter or oil, for frying
  • 1/2 cup chopped walnuts

Method

1. Place the oats into a blender, and blend until they have reached a flour-like consistency.

2. Add the buckwheat flour, baking powder, cinnamon, and salt to the blender carafe and pulse to combine. 

3. Add the bananas, eggs, almond milk, and maple syrup to the blender. Process until well combined, about 30 seconds. Let the batter rest for about five minutes. 

4. While the batter is resting, heat a nonstick or cast iron skillet over medium low heat. Lightly grease the skillet with butter or oil. 

6. Working in batches, add heaping quarter cups of batter into the hot skillet, gently spreading the mixture into circular shapes if needed. Sprinkle the chopped walnuts onto each pancake while the batter is still wet, about 1-2 tsp per pancake. Once the edges begin to appear dry and the bottom sides are golden brown (about 3-4 minutes), flip each pancake and cook for another 3-4 minutes, or until cooked through.

7. Transfer to a 200 degree F oven to keep warm or serve immediately with maple syrup. 

* If not following a low-FODMAP diet, you may use ripe or unripe bananas! For individuals eating low-FODMAP, bananas that are still slightly green on the outside are best, per Monash University. 
** If you're not low-FODMAP and are making these with ripe bananas (see above), feel free to omit the maple syrup - they're pleasantly sweet without it! 

Makes 4 servings. 

May 13, 2018 /Veronica Kablan
Pancakes, At Home, In The Kitchen, Breakfast
At Home
2 Comments
Easy Peasy Breakfast Tacos, recipe by Brunchographers

Easy Peasy Breakfast Tacos, recipe by Brunchographers

Easy Peasy Breakfast Tacos

April 21, 2018 by Brunchographers in At Home

I don't need to wax philosophical for you about the magnificence of breakfast tacos. I know it, you know it, we all know it - eggs taste awesome tucked inside a warm tortilla. Add some flavorful accompaniments like savory chopped bacon, smoky potatoes and bell peppers, crunchy cabbage, and a zippy cilantro crema, and you're on the fast track to breakfast heaven. 

Easy Peasy Breakfast Tacos, recipe by Brunchographers

Easy Peasy Breakfast Tacos, recipe by Brunchographers

In my opinion, whether you opt for corn, flour, or otherwise, the fastest way to taco nirvana is to thoroughly char your tortilla. This simple step brings a toasty earthiness and an oh-so-satisfying crunch that you didn't know you were missing. I char mine directly on a gas burner for a few seconds on each side (no frying pan required), but you could also pop them under the broiler for a few minutes to achieve a similar effect. 

Easy Peasy Breakfast Tacos, recipe by Brunchographers

Easy Peasy Breakfast Tacos, recipe by Brunchographers

These tacos are a great way to sneak some extra pep (and veggies) into your breakfast routine, and if you make the veggies and the sauce ahead of time, they will come together quickly enough for a weekday breakfast. We love using tiny street-taco sized tortillas from Milk & Eggs, but you could easily use larger ones and stick with 1-2 tortillas per serving. 

Groceries for Easy Peasy Breakfast Tacos, recipe by Brunchographers

Groceries for Easy Peasy Breakfast Tacos, recipe by Brunchographers

A quick note - this recipe is entirely low-FODMAP, meaning it's low in certain carbohydrates that can be irritating to people with digestive disorders. I'm currently following a low-FODMAP diet for the short term (as prescribed by my doctor to help alleviate some tummy issues), and have enjoyed experimenting with my favorite recipes to fit my current diet! If you and your belly are in a good place, and you want to kick things up a notch and add in some super-tasty FODMAP foods (hello, garlic and onion!), feel free to toss in a diced onion with the potato mixture, or top your tacos with your favorite salsa. Go crazy! 

Easy Peasy Breakfast Tacos, recipe by Brunchographers

Easy Peasy Breakfast Tacos, recipe by Brunchographers

Easy Peasy Breakfast Tacos

Ingredients

For the Tacos
4 slices bacon or turkey bacon
8 eggs
1 russet potato, peeled and cubed
1/2 red bell pepper, sliced thin
1/2 teaspoon salt (plus more to taste)
1/2 teaspoon ground cumin
1/4 teaspoon paprika
1/4 teaspoon chili powder
1 tablespoon olive oil or butter
pepper

For the Cilantro "Crema"
1/2 cup mayo of choice (my favs are soy-free Vegenaise or Primal Kitchen)
1/2 bunch fresh cilantro
juice of 2 small limes (about 3 tablespoons)
salt + pepper to taste

To Serve
12 street-style corn tortillas, or 8 regular (6-inch) tortillas, charred* 
1/4 purple cabbage, shredded thinly
1/4 cup green onions, chopped (green part only if low-FODMAP)
extra cilantro
lime wedges

First, make the cilantro "crema" by combining the mayo, cilantro, and lime juice in a small food processor or blender. Process or pulse the mixture until it's well combined, and it's taken on a bright green color. Season to taste with salt and pepper. Transfer to a jar and refrigerate until ready to use (note: you'll have leftovers, so try it on burgers or as a dip with veggies!).

To make the vegetable filling, begin by placing cubed potatoes in a medium pot and covering with cold water. Bring to a boil, then simmer about four minutes, or until potatoes are tender. Drain thoroughly and set aside. 

While the potatoes boil, cook the bacon to desired crispiness in a large skillet, following package instructions. Once cooked, the bacon to a paper-towel-lined plate to drain excess oil and allow it to cool. Once it's cool enough to handle, give it a coarse chop, or crumble it with your fingers. 

Using the same skillet as used for the bacon, toss the potatoes, bell pepper, and spices in the bacon drippings (note: if using turkey bacon, you'll want to add some extra oil to keep the veggies from sticking to the skillet). Cook over medium heat until the peppers are soft and the potatoes have browned slightly. Set aside. 

In a separate, nonstick skillet, warm the olive oil or butter over medium-low heat. Add in the eggs and whisk them in the pan using a rubber spatula (this is similar to the Gordon Ramsay style, but we find that doing it over low heat allows you to keep the pan on the burner the whole time. That back and forth bit he does is exhausting). Continue to gently push and fold the eggs together until they begin to set. Remove them from the heat and set aside just before they look fully cooked, to avoid drying them out. Season with salt and pepper to taste. 

Now it's time to assemble your tacos. Fill each tortilla with a heaping spoonful of the potato mixture, followed by the eggs, and a bit of crumbled bacon. Drizzle on some cilantro "crema" and sprinkle on shredded cabbage, green onions, and cilantro as desired. Serve with a slice of lime. 

*To char your tortillas, place them directly on a lit gas burner for 5 - 10 seconds on each side, using tongs to flip halfway through. Be sure to keep a very close eye on them if you use this method; they can go up in smoke quickly if left unattended! If you don't have a gas burner, you could also pop them under a hot broiler for a few minutes to achieve a similar effect. 

Note: potato + bell pepper mixture portion of this recipe has been adapted from The Kitchn. 

Easy Peasy Breakfast Tacos, recipe by Brunchographers

Easy Peasy Breakfast Tacos, recipe by Brunchographers

Groceries for this post were kindly provided by Milk & Eggs, our favorite grocery delivery service! All opinions are our own.  

April 21, 2018 /Brunchographers
Tacos, At Home, Cooking, Breakfast, Milk and Eggs
At Home
10 Comments
  • Newer
  • Older